Showing posts with label Tomatoes. Show all posts

Wednesday, August 29, 2012

Refreshing Tomato, Cucumber, and Bell Pepper Salad


Tomato, Cucumber, and Bell Pepper Salad
Whenever I go home to visit, my mom sends back back with a bag full of fresh picked produce. There is something about a salad made of fresh-picked produce that just makes it tastier than your average salad. I wanted to enjoy to celebrate each of the vegetables and fruit and I think this dish allows each ingredient to both shine as well as compliment each other. Not to mention, it is incredibly easy to make!

This recipe can either make 4 portions as a side dish or 2 portions if you really like salad!

Tomato, Cucumber, and Bell Pepper Salad - Serves 4

Ingredients


1 large cucumber (peeled, deseeded and diced)
3 small tomatoes - larger than a golf ball but smaller than a baseball (deseeded and diced/sliced)
1 large scallion (diced)
1 baby red bell pepper (diced)
3 tbsp rice vinegar
.5 tsp toasted sesame oil
1 tsp garlic powder
chili oil
pink sea salt (or your favorite salt)
pepper

Instructions
In a large bowl, toss cucumber, tomatoes, scallion and bell pepper. Set aside.

In a small bowl, whisk vinegar, sesame oil, garlic powder. Add chili oil to taste (I used 5 dashes so there is a small but noticeable kick) as well as salt and pepper to taste.

Toss dressing with vegetables, cover, and refrigerate. You can serve right away however I like to let the dish sit for about 30 minutes to let all the flavors come together.


Nutritional Information (using MyFitnessPal.com to calculate it) for full recipe: 153 calories, 22 grams of carbs, 2 grams of fat, 6 grams of protein and 6 grams of fiber

Tuesday, May 8, 2012

Vegan Chili with Avocado

Vegan Chili with Avocado

Since moving downtown and kicking up the work hours, I have been finding myself spending less and less time in my gorgeous kitchen. Which is completely obvious by the lack of posts the last couple of months, right?

As the school year comes to a close and the realization that I am about to spend my summer living in dormitories hits me, I am racing back to my kitchen to kick it into high gear. However, I still don't have a ton of time during the weekdays. Thus, I am trying to prepare meals that can be reheated throughout the week. This one was a winner so I had to share.

Vegan Chili with (optional) Avocado - Serves 8

Ingredients
1 block of extra firm organic tofu packed in water (14-ounce package)
2 tablespoons chili powder
1 teaspoon ground cumin
2 small red onions, chopped
2 lb frozen broccoli
5 cloves of garlic, diced
1 15-ounce can of no-salt added pinto beans, drained and rinsed
1 15-ounce can of no-salt added black beans, drained and rinsed
1 15-ounce can of no-salt added kidney beans, drained and rinsed
1 28-ounce can of diced tomatoes
1 4-ounce can of chopped chilies
2.5 cups frozen sweet corn kernels
2 large zucchini, diced

Instructions
1. Freeze the tofu. Defrost it fully. Squeeze all excess water and crumble.

2. Lay bag of frozen broccoli out on table. Beat to death with a meat cleaver. Feel better about life and get lots of broccoli crumbs in the process. I guess you could also just defrost and dice it but that's not what I did. My method was both tasty and therapuetic ;o)

3. Heat large stockpot over medium-high heat and brown tofu with chili powder and cumin for several minutes.

4. Add onions and cook for several more minutes.

5. Add remaining ingredients. Stir well. Bring temperature down to a simmer. Cover and let cook for 2.5 to 3 hours.

I mashed up an avocado and spooned some of it on top for a creamy element. Nutritional Information does not include avocado because I'll be honest... I can't measure that goodness!

Nutritional Information for 1/8 of recipe: 296 calories, 2.9g fat, 47g carbs, 14.5g fiber, 17.5g protein
Nutritional Information for full recipe: 2364 calories, 23g fat, 378g carb, 116g fiber, 17.5g protein


Friday, October 28, 2011

Peanut Butter, Kidney Bean, and Yam Stew

Peanut Butter, Kidney Bean, and Yam Stew - Do you know how hard it is to photograph late at night?!?

I love a good stew and I love peanut butter, so this summer when I had an opportunity to try some peanut butter stew, I was in LOVE! The stew was made by one of the administrators at the residential debate camp I was teaching at and she made it in a slow cooker. I kept meaning to ask for the recipe and I am sure at one point she even told me where she got her inspiration... but as the summer wound down and school picked up, I forgot to ask. However, I never forgot that stew.

This weekend while in Alaska, I was reading Colleen Patrick-Goudreau's The 30-Day Vegan Challenge, I found a stew that sounds like it had a similar flavor profile as the stew I enjoyed this summer although slightly different. So I took the recipe from this book, along with what I remembered from the summer stew, and modified it for my slow cooker. The resulting stew was creamy, sweet, spicy, salty. A mouthful of flavor and texture that tasted even better the second day!

While you can probably sub in sweet potatoes (and in some parts of the country yams are more difficult to find), I am a fan of the drier and more starchy yam. According to the Library of Congress, here are the differences!

The stew in a different lighting attempt!
Peanut Butter, Kidney Bean, and Yam Stew
Makes 10 1-cup serving

2 medium yellow onions, peeled and chopped
2 red bell peppers, deseeded and chopped
3 yams, cubed (I keep the skin on and scrub them well before cutting them)
5 cups of water
2 cubes of vegan vegetable bouillon cubes (you can replace these and the water with 5 cups of vegetable broth)
1 can (15-ounce) of kidney beans, rinsed and drained
1 can (15-ounce) of diced tomatoes
1/2 cup of creamy peanut butter
1 tbsp minced garlic
1 tsp minced ginger
1 tsp cumin
1 tsp ground cinnamon
1 tbsp brown sugar
1/2 tsp chili powder
1/2 tsp sea salt

Mix all ingredients in slow cooker and cook on low for 8-11 hours (I say 11 because that's when I got home and enjoyed it!).

When I calculated the WW pointsplus points for the items that have points (yams, bouillon, kidney beans, peanut butter, brown sugar) I got 5 points per serving.

Thursday, October 28, 2010

CSA Box: Eggplant, Tomato, Basil, Kale, Okra, Radish, Garlic, Arugula, Onion


This week my CSA box screamed BAKE ME. Maybe it was the small sample loaf of multi-grain bread from a local bakery, Bread and Bun, that was included this week. Or maybe it was the lack of vegan calzones in the freezer. Or perhaps it was just the dizzying array of fresh goodies in this week's box. In addition to the bread, this week included:
  • Thai Basil
  • Italian Eggplant
  • Red Russian Garlic
  • Arugula
  • Red Russian Kale
  • Long Red of Florence Torpedo Onions
  • Okra
  • Easter Egg Radishes
  • An Heirloom Tomato
  • A Slicing Tomato
First, I HAD to make kale chips. You knew that was happening. I am sure there are other ways to prepare kale, but with my busy life and my love of dehydrated kale, I couldn't see another use. Red Russian imparted a different flavor profile, a little less sweet than curly kale, but still very good!

Since I had extra trays in the dehydrator, I decided to slice the heirloom tomato thin, lay it in a single layer on the tray, and sprinkle it with Italian seasoning. Now I also had herbed tomato chips! These were super yummy as an evening snack a plane trip.

I also fell back on another favorite. I made Okra Fries with the small bag of okra pods. To answer a question from last week, baking the okra in this method doesn't leave them super slimy. They are soft on the inside but crisp on the outside which I think helps.

It may not be a real "calzone" but I used a number of ingredients to make 8 vegan sandwich pockets which then were individually wrapped and frozen for quick lunches and dinners. Using the dough recipe from these pockets, I diced the eggplant, sprinkled it with salt and let it sit for 20 minutes. Meanwhile, I sauteed the onions and garlic (which I had diced) in organic canola oil. I squeezed the excess liquid from the eggplant and added it to the pan. Then the slicing tomato was added along with the basil. I added nutritional yeast after cooking and filled the dough with the prepared mixture then baked according to the instructions.

The arugula and garlic was used in a cold barley salad. I cooked the barley with some of the garlic then tossed it with an unfiltered olive oil and lemon juice vinaigrette along with peas, cherry tomato quarters, and the arugula. The leftover arugula became a simple green salad that paired nicely with the pocket sandwiches.

The radishes and onion were so pretty, I had to make another salad! This one involved slicing the radishes, an onion, and an English cucumber thinly. I sprinkled them lightly with salt and then pressed the water out of them. I made another dressing with olive oil and red wine vine and some of the dried chili peppers from last week and tossed the vegetables in the dressing.

If I didn't enjoy making my own bread, I would definitely order more from Bread and Bun. This multigrain loaf became my afternoon snack for several days. I would slice a couple of thin slices off the bread and put creamy almond butter and Nutella on it. So tasty!

Friday, October 22, 2010

CSA Box: Squash, Turnips, Okra, Tomatoes, Corn, and more!


Produce picked fresh the day you pick it up from the farm. Who could imagine something better that delicious goodies you can see being grown and prepare that evening in your home! Community Supported Agriculture (CSA) has been growing in popularity around the country. A CSA is when a local farm offers up limited "shares" of the harvest for sale to community members. I was lucky enough to get an opportunity to purchase a half-share at Full Circle Farms in Sunnyvale, Calif. After picking up my first week of produce, I posed a question to Twitter to see if anyone would be interested in how I am using my CSA box each week. You asked, and I delivered. This was my box for the week of October 11th.

This delivery included:
  • Silver Queen Corn
  • Red Russian Kale
  • Oils of Paicines Organic Olive Oil Sample
  • Yellow Borettana Onions
  • Sage
  • Mixed Peppers: Poblano, Hot Wax, Dried Cayenne
  • Slicer Tomato
  • Cherry Tomatoes
  • Hakurei Turnips
  • Sweet Dumpling Squash
  • Okra
I knew I would be traveling for part of the week at a debate tournament. Which meant that I both wanted to ensure I used the produce before traveling but also wanted to bring some of these goodies with me on the plane.

Corn: I did a quick partial steam on the corn to set the milk. Once it cooled, I used the OXO Good Grips Corn Peeler I scored from IFBC, to shuck the kernels. I then dehydrated them and bagged them for use later this winter. Snuck a couple bites for a snack and it was sweet and country. Can't wait to throw them into a dish or just munch on them one afternoon!

Kale: This one was easy. Kale chips!

Olive Oil & Sage: I washed and left the sage leaves to dry between paper towels. I then sliced the sage leaves into ribbons and added it to the oil to infused. I should have sage oil soon!

Onions: Sliced thin, I added these to a homemade miso soup.

Mixed Peppers: Sliced and dried to spice up future recipes!

Slicer Tomato: Sliced and ate fresh by itself. Fresh local tomatoes are amazing!

Cherry Tomatoes: These were cut in half and tossed into the dehydrator. After drying, I had snacks for the plane.

Turnips: These were sliced super thin, tossed in a drizzle of organic canola oil and some sea salt and chili powder. Dried to make turnip chips for traveling.

Squash: Sliced and drizzled with coconut oil. Roasted. Yum.

Okra: Spicy Okra Fries to enjoy on my trip to the airport.

Hopefully this gave you some ideas! I look forward to sharing the bounty and how it is used each week. However, I would love your ideas. How would you have used the goodies in this week's CSA box?

Sunday, October 3, 2010

Simple Ratatouille Recipe aka "Rat-tat-tat-too-eeee!"


This vegan dish with a complicated sounding name (unless you have seen the Disney movie) is a hearty entrée perfect to make on a Sunday and enjoy all week. You can change up the proportions of vegetables to your liking and adjust spices as well. While I used fresh herbs, if they aren't in season you can easily use dried herbs in their place, although the amounts may need to be adjusted. I developed this recipe as part of the round three Project Food Blog challenge of pairing wines at a six-course vegan dinner party.

To modify this for the HMR Healthy Solutions Diet, omit oil, use 6 ounces of vegetable broth and two tablespoons of vinegar in place of wine.

1 1-lb eggplant, skinned and diced
2 tsp salt
1 28-oz can diced tomatoes
5 cloves garlic, peeled and diced
1 tsp black pepper
1/3 cup chopped fresh basil
1/2 cup chopped flat-leaf parsley
2 tbsp olive oil
3/4 lb yellow onion, diced
 2 bell peppers, any color, diced (I used four small peppers but they are hard to find sometimes)
1 1/4 lb zucchini, diced
6 oz dry white wine of your choice

Spread eggplant in a single layer on paper towels and sprinkle with salt. After twenty minutes, press eggplant with fresh towels to remove liquid that the salt has brought out. Do not rinse.

In a deep pot, cook tomatoes, garlic, ground pepper, basil, and parsley on medium heat.

In a skillet, cook onion and bell peppers in olive oil for ten minutes on medium-high heat. When the vegetables have started to brown, add mixture to pot with tomatoes. Add eggplant and zucchini to tomato mixture as well and stir to combine all ingredients.

Cover the pot and cook on medium-low for 45 minutes. Add wine and cook for an additional 15 minutes.

I served the ratatouille with a brown rice couscous I found at Whole Foods. This filling dish made a tasting portion for 10 with tons of leftovers and could easily make 8 entrée portions. Nutritional information does not include couscous. One serving has 120 calories, 3.5 grams of fat, 5.75 grams of fiber, 3 grams of protein.

Sunday, September 26, 2010

Uncovering Uthappam: Celebrating Cultural Classics

Uthappams with Onion, Tomato, and Coriander

When I was younger, I was a very picky eater. My parents were not okay with this. They wanted to expose me to a variety of foods and to try everything. I remember a couple of nights where my dad would tell me that I could just go hungry if I didn't want to eat what was for dinner. I probably threw a temper tantrum but would inevitably eat dinner because I was hungry.

My parents were right. I might not have liked everything I was fed but it expanded my palate and taught me to try everything at least once. When I found out on Friday that Uncovering Food had made it to round two of Project Food Blog (Thank you to those who voted!), I was excited to find out what the challenge was:

"Ready to tackle a classic dish from another culture? Pick an ethnic classic that is outside your comfort zone or are not as familiar with. You should include how you arrived at this decision in your post. Do your research then try to pull off successfully creating this challenge. Try to keep the dish as authentic as the real deal, and document your experience through a compelling post."

I am always ready to learn about new cuisines! This was right up my alley! At first I thought I would learn how to make a traditional Hungarian dish since my dad's family is from Hungary and I have never learned how to make any of the dishes he made me. This would be out of my comfort zone but there were three other challenges I faced when selecting my dish. One, I am familiar with Hungarian food. In my mind this challenge was asking me to find a classic dish from a culture that I don't know very well. The second constraint was that I am partaking in the Physicians Committee for Responsible Medicine 21-day vegan challenge which means the dish I would be making would need to be vegan. The third constraint was that I would be at a debate tournament all day Friday, Saturday, and Sunday so I would have limited prep and shopping time late in the evenings and early in the mornings.

A number of students I work with are from southern states in India and I knew a couple of them were vegan, so I asked for a restaurant recommendation for lunch on Friday to explore the cuisines of this part of India. My assistant debate coach and I ended up at Madura, a vegetarian restaurant with a number of vegan options. We ordered a variety of items on the menu to try and when I broke out my camera, that's when the education started.


Madura Dishes (clockwise from left): Medhu Vada & Rava Kichadi; Pea, Onion, and Mushroom Uthappam; Spring Dosa
The owner of the restaurant asked what I was taking pictures for and I explained the Project Food Blog challenge. He was especially nice to us upon learning this and explained to me how each dish was prepared and what ingredients were in every dish. I will definitely be going back to Madura to enjoy more of the dishes that were lighter than Indian dishes I was more familiar with from other regions of the country. Every dish I tried was full of flavor and would have been fun to make, but keeping in mind that Uncovering Food is about exploring healthier options, I opted to make Uthappam, a pancake that is eaten for breakfasts and lunches and is embedded with a variety of vegetables and spices.

What I failed to learn at the restaurant was how much time goes into preparing the batter. The first step takes 6 to 12 hours, then after a few prep steps you have another 12-48 hours of fermentation before the cooking of the batter. Which meant I would need to buy ingredients on Friday night after the tournament and cook the Uthappam on Sunday morning before leaving for the 8 a.m. tournament.

I also hadn't anticipated that one of the primary ingredients would be difficult to find at a traditional American grocery store. When I was told the dish contained lentils, I wrongly assumed they were the ones I was familiar with. However, Uthappam utilizes Urad Dal which is much smaller than lentils most Americans are familiar with.

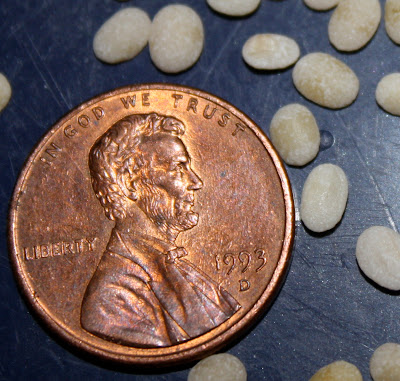
This is a real penny. Split Urad Dal is very small! 
Be careful to not confuse it with larger lentil varieties.
Luckily, after a harrowing search by fellow coaches and students I found a kit for another Indian dish at Whole Foods that had a bag of plain urad dal in it, so I was saved with only seven minutes before the store closed. I took my ingredients back to the tournament, which hadn't ended, and anxiously waited for the rounds to finish.

The recipe I ended up making came about from both my conversations at Madura but also with parents at the debate tournament. I learned that many people now buy the flour pre-made for Uthappam but the best are always made from scratch. It reminded me of the difference between Bisquick and homemade hot cakes. However, I never got exact measurements and after doing some online research, I realized there is no exact formula. The ratios of rice to urad dal are between 2:1 and 3:1 and sometimes have the addition of cooked rice and/or flattened rice in the batter. While I would have probably soaked my rice and urad dal a bit longer because it supposedly heightens the flavor of the Uthappam, this recipe got rave reviews from the students and coaches who tried it on National Pancake Day (how appropriate to prepare these Indian pancakes on a day that celebrates it's American cousin!).

Uthappam is a thick hearty pancake that can be topped with a variety of vegetables, fresh herbs, and spices.

Tomato-Onion-Coriander Uthappam

2 cups long-grain white rice, uncooked
1 cup split urad dal, uncooked
1 tsp sea salt
1 vine-ripened tomato, sliced thin
1 small purple onion, sliced thin
fresh coriander, minced
canola oil, as needed

Rinse rice and urad dal in separate containers and soak for eight to twelve hours.

Drain and grind rice while reserving the liquid. Drain and grind urad dal while reserving the liquid. Mix rice powder, urad dal powder, and salt together. Add small amounts of each liquid until you reach a thick but spreadable consistency. This will vary depending on how long you soaked the rice and urad dal, but I added about a half cup of liquid. You will want the batter to look almost like a thick pancake batter that can be poured but is thick enough for the toppings to stick to. Cover the batter and let sit in a warm place to ferment for 12 to 48 hours.

Warm a large frying pan or griddle to a medium-high heat. I found in my research that the Uthappam is often cooked on a Tawa or Tava which can reduce the amount of oil needed because of the concave shape of the pan/griddle.

Pour the desired amount of batter on the griddle and spread to a thickness of about a quarter to half inch. Sprinkle tomato, onion, and coriander on the uncooked side. You can choose to drizzle oil over the top of the Uthappam or around the edges. Once the bottom is browned, flip over and let the toppings-side cook for about ten seconds. You want the batter to brown lightly to secure the toppings without burning the toppings.

Remove from pan and serve with a tomato chutney or Sambar, a lentil soup that usually contains tamarind, toor dal (yellow lentils), and a blend of spices commonly known as sambar curry powder.

Recipe makes 8 Uthappam approximately six-inches in diameter. Nutritional information does not include the optional oil.

One tomato-onion-coriander Uthappam has 258 calories, .69 grams of fat, 9.14 grams of fiber, 8.68 grams of protein.

Sunday, August 2, 2009

July Mystery Challenge Awards!


Here's my attempt to meet the challenge. I have no idea how to make it look pretty but gee golly it was tasty. It is just eggs scrambled with milk and cook with chopped roma tomatoes. Top the scramble with blue cheese and toss it in a tortilla!

That said... I was clearly outdone by some FABULOUS reader entries! Check out this deliciousness. Click on the picture and it will take you to their blog entries. YUM!

Tara over at Cooking from Scratch wins top honors with her Gorgonzola and Sun Dried Tomato Crackers. This actually sound like they are pretty easy to make, and they look awfully tasty!


While she claims to have missed the deadline, I still wanted to recognize Melody over at Trap Door and send her an Honorable Mention prize because her Tomato Tart is drool worthy!


Check out both of these fabulous blogs as they are full of even more deliciousness. The August challenge will be posted tomorrow. Look out... it is going to get hot up in here...

Wednesday, June 3, 2009

Shiitake and Cherry Tomato Couscous


This is an easy dish to throw together on a hot day. I served it as an entree with Greek yogurt and strawberries for dessert. This recipe makes one entree serving, or two sides.

1/4 cup couscous, dry
1 cup organic mixed medley cherry tomatoes
1/6 oz fresh Shiitake mushrooms, sliced
1/2 tsp Garlic Gold olive oil
Mrs. Dash Garlic and Herb seasoning, to taste
salt, to taste
pepper, to taste
hot water, 1/4 to 1/3 cup

Heat oil in saucepan over medium to medium-high heat. Toss cherry tomatoes in warmed oil. Just before tomatoes begin to wilt, add mushrooms. When tomatoes begin to wilt, add 1/4 cup of hot water. Add couscous and stir. You may need to add slightly more water. Add seasoning to taste. While stirring in seasoning, pop a few of the tomatoes and mix into the couscous. Enjoy!

For complete recipe: 237 calories/2.7 grams of fat/5 grams of fiber/7.4 grams of protein

Saturday, April 4, 2009

Strawberry Kiwi Salsa


1/2 pint of strawberries, diced
2 kiwis, diced
2 small/medium vine ripened tomatoes, diced
1 avocado, diced
1 jalepeno, deseeded and dehulled, diced
1/4 cup chopped white onion

Toss all ingredients gently and let rest for five minutes or more. A couple of notes: I keep the skin on the kiwi because according to a number of sources including the Cancer Resource Center, kiwi skin carries a number of nutrients. As long as you scrub well and dice small, you won't notice the skin and you will get bonus health benefits. I also served the salsa in a mini pita from Trader Joe's (70/.5/0/2) and 2 ounces of grilled boneless, skinless organically fed chicken breast. The salsa was also just great eaten by itself (I definitely had a couple spoonfuls).


The nutritional information is for 1/4 of the recipe. I did not measure it out but I can tell you that is over 1/2 cup of salsa since I just put away 2/3 of the recipe and it barely fit into my 2.5 cup container!

Nutritional Information: 116 calories/7 grams of fat/5.5 grams of fiber/2 grams of protein

I am also including it for 1/8 since I realized just how much salsa it makes (I tried eating a quarter of the recipe and it is a LOT)!!!! You probably won't even need this much but it is just THAT good!

Nutritional Information: 58 calories/3.5 grams of fat/2.75 grams of fiber/1 gram of protein

Wednesday, March 25, 2009

Mystery Box Challenge: Baked Stuffed Peppers


When Doug challenged me several weeks ago to come up with a recipe that included his choice of random ingredients (ala the Food Network show "Chopped"), I readily agreed. When he told me the ingredients were Bell Peppers, Sharp Cheddar Cheese and Oatmeal.. I gagged slightly. This would be a challenge. At first I thought about doing a quiche with an oatmeal crust. However after hanging out with my Hungarian dad, I settled on something more familiar. Stuffed bell peppers!

This recipe makes two halves, which I am counting as two servings. You can lower the calories by using reduced fat cheese or a leaner ground meat. These freeze and reheat well. Enjoy and I look forward to seeing who wins the $10 Starbucks gift card! The March challenge closes at midnight on the 31st!

Baked Stuffed Peppers

1/4 lb 90% lean ground sirloin
1/4 cup extra sharp cheddar cheese, shredded
1 green bell pepper, halved and cleaned
1/4 cup old fashioned oatmeal
1 small white onion, diced
1 small tomato, diced
1 tsp chili powder
1 tsp italian seasoning
1/2 tsp sea salt
1 small can of tomato sauce

Preheat oven to 400 degrees.

Set aside a pinch or two of cheese. Mix remaining ingredients, except bell pepper and tomato sauce, together until blended. Stuff into two halves of the pepper and bake for 20 minutes.

Open the can of sauce and pour over peppers. Bake for 20 more minutes.

Sprinkle remaining cheese on top. Bake for 5 more minutes.

This should be enough time to cook through while not leaving the bell pepper soggy. You can check the internal temperature of the meat with a thermometer.

Nutritional Information: 250 calories/10.5 grams of fat/4.5 grams of fiber/17 grams of protein

Wednesday, January 28, 2009

Spicy Veggie Blue Cheese Polenta Casserole

You can change up the vegetables in the scramble based on what you like and is available. You could also make your own polenta if you are feeling ambitious!

1 tube Sundried Tomato Polenta (I find mine in the produce section, 1 serving is 1 point)
1 white onion, diced
8 oz Cremini mushrooms, sliced (I buy mine presliced)
1 TBSP olive oil
3 small zucchini, diced
5 oz grape or cherry tomatoes, halved
2 cups fresh spinach
2-4 TBSP dried crushed red pepper
1-3 tsp garlic salt
1-3 tsp black pepper
2 oz reduced fat crumbled blue cheese

Slice polenta tube into 8 slices. Pan fry in a pan sprayed with cooking spray until both sides are browned. Lay in one layer in casserole dish.

Heat olive oil in pan. Cook onions until almost translucent and add zucchini. Add spices and cook until zucchini starts to soften. Add mushrooms and cook until mushrooms start to soften. Add tomatoes and spinach and toss in pan until spinach is starting to wilt. At this point you will have a sauce in the bottom of the pan. If you are making this dish ahead of time, you want to used a slotted spoon for the next step. If you are serving immeadiately, you might want to keep the gravy.

Spoon vegetable scramble in an even layer over polenta. Sprinkle blue cheese over dish immeadiately.

This dish makes 4 servings at 3 points each.

Thursday, January 1, 2009

Lentil Chili

This chili is great by itself, even better over a baked sweet potato with some light cheddar cheese.

Serving size is 1/2 cup. Makes a fair number of servings (have you made it? how many servings did you get?).

1 lb dry lentils
5 cups water
garlic salt, to taste (I am guessing I used 2 tsp)
cumin, to taste (I am guessing I used 2 tbsp)
Mrs. Dash Hot n Spicy, to taste (I am guessing I used 2 tbsp)
dry parsley, to taste (I am guessing I used 1 tbsp)
1 medium yellow onion, diced
4 cloves of garlic, diced
1 15 ounce can of Hormel canned tomatoes for chili (you can use a can of diced tomatoes in juice)
1 6 ounce can of tomato sauce

1. Boil water. Add lentils and salt and cover. Cook on low for 30 minutes.

2. Add remaining ingredients and mix. Add additional water if you want a juicier consistency. I used the tomato sauce can and added an additional 4 ounces of water or so.

3. Cook for another 30 minutes on low or until lentils have desired texture.

NI for the lentils and can of tomatoes: 105/0/12

Tuesday, December 9, 2008

Arugula and Pasta Salad with Blue Cheese and Walnuts

2 tbsp coarsely chopped walnuts, toasted
6 oz uncooked bow-tie pasta
a couple of handfuls of baby arugula (the recipe said 2 cups... I ma have put in more)
2 tbsp dried chives (if you can find fresh, let me know how it tastes)
1 cup cherry tomatoes, halved (the recipe said grape tomatoes)
1 tbsp distilled white vinegar (the recipe said white wine vinegar)
1 tbsp unfiltered olive oil (the recipe said extra virgin)
salt, to taste
pepper, to taste
3 tbsp crumbled blue cheese

Toast the walnuts in a heavy skillet over medium high heat for 1-2 minutes and set aside.

Cook pasta in lightly salted water. Set aside 1 tbsp of water before draining the pasta. Toss pasta with arugula and leave in a covered bowl until arugula wilts (five minutes or so). Meanwhile, mix pasta water with vinegar and oil as well as pepper and salt to create a dressing. Toss in tomatoes and chives. Add dressing and walnuts. Sprinkle with blue cheese (I mixed the cheese in while the pasta was still slightly warm which allowed it to melt a little and spread more flavor).

This recipe is modified from the week one Weight Watcher Momentum Plan book which is why I included the original recipe in (). According to the book, it should make four servings at approximately 1.25 cups per serving. I will edit to report back if it indeed makes that many :-)

5 points per serving.

Tuesday, November 11, 2008

Easy Breezy Caprese (salad)

I hate fresh tomatoes. I really really am not a fan. Or at least that was my claim until I had trouble finding a low point dinner in Boston and ended up ordering a Caprese Salad. Which isn't as low in points as I guessed... but I was in LOVE after that and determined to make it at home!

1 (or 2 depending on the size) Heirloom or Beefsteak tomato
2 oz fresh mozzarella
1 tsp unfiltered olive oil
2 tsp aged balsamic vinegar (make it the good stuff!)
4 or 5 giant fresh basil leaves, diced into thin strips

Slice the tomato in 1/4-1/6 inch slices. Slice cheese really thin to make it stretch over the whole salad. Fan alternating slices of tomato and cheese on a plate. Drizzle olive oil and vinegar. Top with fresh basil.

Serves one for dinner.

Sunday, September 7, 2008

Cheesey Spinach Pasta

1 recipe of the Cheesey Heirloom Tomato Sauce
1 2oz ball mozarella (on top of the one in the sauce)
1 pt worth of reduced fat parm cheese
1 cup chopped onions
1 lb of fresh spinach
6 oz whole wheat pasta
garlic salt (to taste)
additional seasonings you can play with: italian seasoning, pepper, mrs. dash

I happened to freeze a bunch of chopped onions and a batch of sauce before I left for a recent work trip. I got home from the airport tonight and was craving veggies and carbs and cheese... so this turned out really well and I wanted to remember it!

Cook pasta, set aside. Cook onions until they start to brown. Add sauce and any additional seasonings you want to play with. Add spinach and cook down. Add pasta and toss. Finally add additional mozzarella and parm cheese to make this an extra cheesey dish!

4 servings at 5 points each. FABULOUS!

Wednesday, September 3, 2008

Cheesey Heirloom Tomato Sauce

2 large heirloom tomatoes
1 2-oz fresh mozzarella ball
handful of fresh basil
1 tsp olive oil
Mrs. Dash Garlic and Herb spices, to taste


Blend all ingredients together. 2 servings at 2 pts each. You could add fresh garlic to amp up the flavor (I just didn't have any left).

Wednesday, July 30, 2008

Squash Lasagna

I made this dish using what appeared to be a globe shaped caserta squash. It can be done with any summer squash I am sure.

2 baseball sized squash, sliced into 4 hamburger slices each
4 golf ball sized tomatoes, sliced in half and deseeded
1/4 lb of sweet baby broccoli
3 heads of garlic (you can probably get by with two, also mine were on the smaller side), slice off tops to expose cloves
2 tbsp ff Italian dressing
3 tsp Parmesan cheese

Heat the grill to a medium high heat.

All of the following can be done at the same time if your grill is big enough:

1. Tomatoes go open side down on the grill for about 3 to 5 minutes (until they start to shrivel and brown)

2. Broccoli goes on the grill until florets start to crisp.

3. Garlic is wrapped in a foil packet and grilled for 10 minutes or until soft.

5. Squash is burshed with Italian dressing and grilled until starts to soften/brown and then flip. Cook for about 10 minutes, take off grill before it burns though.

Okay after everything is grilled. Put garlic, broccoli, and tomatoes in a blender or processor and blend until a chunky sauce is formed.

Lay down half the squash on the plate. Cover with about half the sauce. Sprinkle on 1.5 tsp of cheese. Lay down next layer of squash, sauce and then cheese.

I took this for lunch after making it the night before and the sauce had permeated the squash. I think I would compare it more to an eggplant Parmesan than a lasagna in texture the next day.

CORE NOTE: This is only Core with FF or Soy Parm cheese.

Thursday, July 24, 2008

Crockpot Vegetarian Stuffed Peppers

6 oz Gimme Lean Vegetarian Ground "Beef"
1/2 cup Uncooked Couscous
1 Zucchini
4 Tomatoes, the size of golf balls
4 Bell Peppers
Garlic Salt
Mrs. Dash Garlic and Herbs Seasonings
Chili Powder
Pepper
3 Small Heads of Garlic (optional)
Cooking Spray

1. Spray the inside of your crock pot.

2. Prepare the couscous with water according to package instructions. Add to mixing bowl wtih vegetarian protein.

3. Dice the Zucchini and Tomatoes, add to bowl with vegetarian protein and couscous. Add ingredients Garlic Salt through Pepper to taste. Blend all of the ingredients. I choose to do thise by hand tho insure full blending.

4. Slice the caps off the Bell Peppers to make bowls. Clean insides of peppers from ribs and seeds. Place bell peppers into slow cooker and make sure they are standing. I used foil on the sides to help support them since my crock pot has a larger base.

5. Divide mix into four parts and stuff into pepper bowls. You can replace the tops of the bowls if you choose for added flavor infusion.

6. Slice the tops off the garlic heads. Place on top of foil, or alongside peppers on an elevated place inside the slow cooker. This will allow the garlic to infuse the peppers while essentially roasting the garlic as well for future use.

7. Cook on low for 6 to 7 hours. These can be frozen and reheated for future meals.

Tuesday, July 8, 2008

Zucchini Spaghetti

4 Zucchinis
1 can of Italian Stewed Tomatoes
Garlic Salt, to taste
Italian Seasoning, to taste
Pepper, to taste
Mrs. Dash Garlic (or Onion) and Herb, to taste
4 TBSP Nutritional Yeast

Shred the zucchini into long thin strands (this blog gives several ideas how to do this).

Using a saucepan heated to medium high, heat the tomatoes (in juice) totally through. Add raw, shredded zucchini to the tomatoes and add seasonings to taste. Stir and blend thoroughly. After a couple minutes, add nutritional yeast and let simmer on low until sauce has thickened. It will still be kind of soupy.

I choose to strain the juices before storing the leftovers. Makes two servings, although the points are the same for one serving if your nutritional yeast is only one point for a quarter cup.

Disclaimer:

I get asked by readers if I am being paid to push products. The simple answer is no. In fact, most of the products I write about are ones I have found and purchased during my trips to the grocery store or on the road. Occasionally, a company will send a sample my way and if I believe the product will serve a need for my readers and I would buy the product myself, then I will share it with you. Sometimes I will write to a company after reading about it, if I believe it will help us lead healthier lifestyles. But even then, if the product doesn't pass my scrutiny, it won't make the screen of Uncovering Food. You can trust that every product or recipe posted here has passed through my lips, and that I wouldn't blog about it if it wasn't worthy of you... my favorite readers.