A topic among debate coaches recently has been how to prepare food for a large group of people that is both inexpensive but healthy. This morning a Facebook discussion inspired me to collect some of my favorite recipes from around the Web along the lines of this topic.
Please add links to this discussion and add to the collection of healthy low-cost recipes for a crowd!
Slow-Cooker Recipes:
I am going to start by re-sharing my own version of a classic stew. This peanut, yam and kidney bean stew is inexpensive but filling. If you have peanut allergies, you could easily sub in sunflower seed butter.
Averie Cooks has a fabulous vegan gluten-free recipe for Bourbon Maple Slow Cooked Beans. This is a great protein option that both omnivores and herbivores can enjoy!
Pinch of Yum has a sweet potato lentil recipe that is also vegan and gluten-free. I would use a light coconut milk to reduce the calories. Lentils and sweet potatoes are inexpensive and full of nutritious goodness.
I love the idea of having a sandwich bar for people to customize their own sandwiches. Avoid just having boring cold cuts while giving your herbivore friends a warm protein option with Healthful Pursuit's Stampede BBQ Lentil Sandwich filling!
Stovetop Recipes:
I am in love with my own Ratatouille recipe. I have lightened up my own recipe by taking out the wine and subbing in 2 tbsp of white wine vinegar mixed with a half cup of water. I also use cooking spray now instead of the olive oil. I make a big batch of this on the stove top but it could easily be left in a slow cooker on warm at an event.
This Chana Masala recipe from Orangette is awesome because it can be made the night before and the flavors improve the next day! You can save money, especially if you are increasing the amount you are preparing, by starting with dry beans.
Prep in Advance - Serve Hot or Cold:
Roasted vegetables are an awesome dish you can prepare for a large group. You can utilize whatever is in season. Eating Well has three easy tips on how to roast up some vegetables. Once roasted you can serve warm or cold, as a platter of vegetables or mixed with a grain like quinoa to make a salad.
Quiche are an excellent dish to serve up as an event because while they are awesome warm, they are also good without reheating. And removing the crust drastically reduces calories. Cooking Light has three great crustless quiche recipes including Garden Vegetable, Smoked Turkey Spinach, as well as Broccoli & Cheese.

Showing posts with label Vegan. Show all posts
Showing posts with label Vegan. Show all posts
Sunday, October 26, 2014
Thursday, September 11, 2014
Easy and Flavorful Steamed Artichokes
Absence makes the heart grow fonder, right?
I know it's been a long time since I posted here on Uncovering Food but I promise I have my reasons. After years of struggling with my weight, I began a very strict medically-supervised diet through Palo Alto Medical Foundation. I have lost over 120 pounds and over the last month began transitioning and incorporating outside fruits and vegetables into my diet and continue the transition step-by-step. Since I didn't feel it fit with the theme of this blog, I chronicled my journey at Healthy Academic where I will continue to document my journey. However I intend to post all recipes that don't utilize products from the diet here at Uncovering Food!
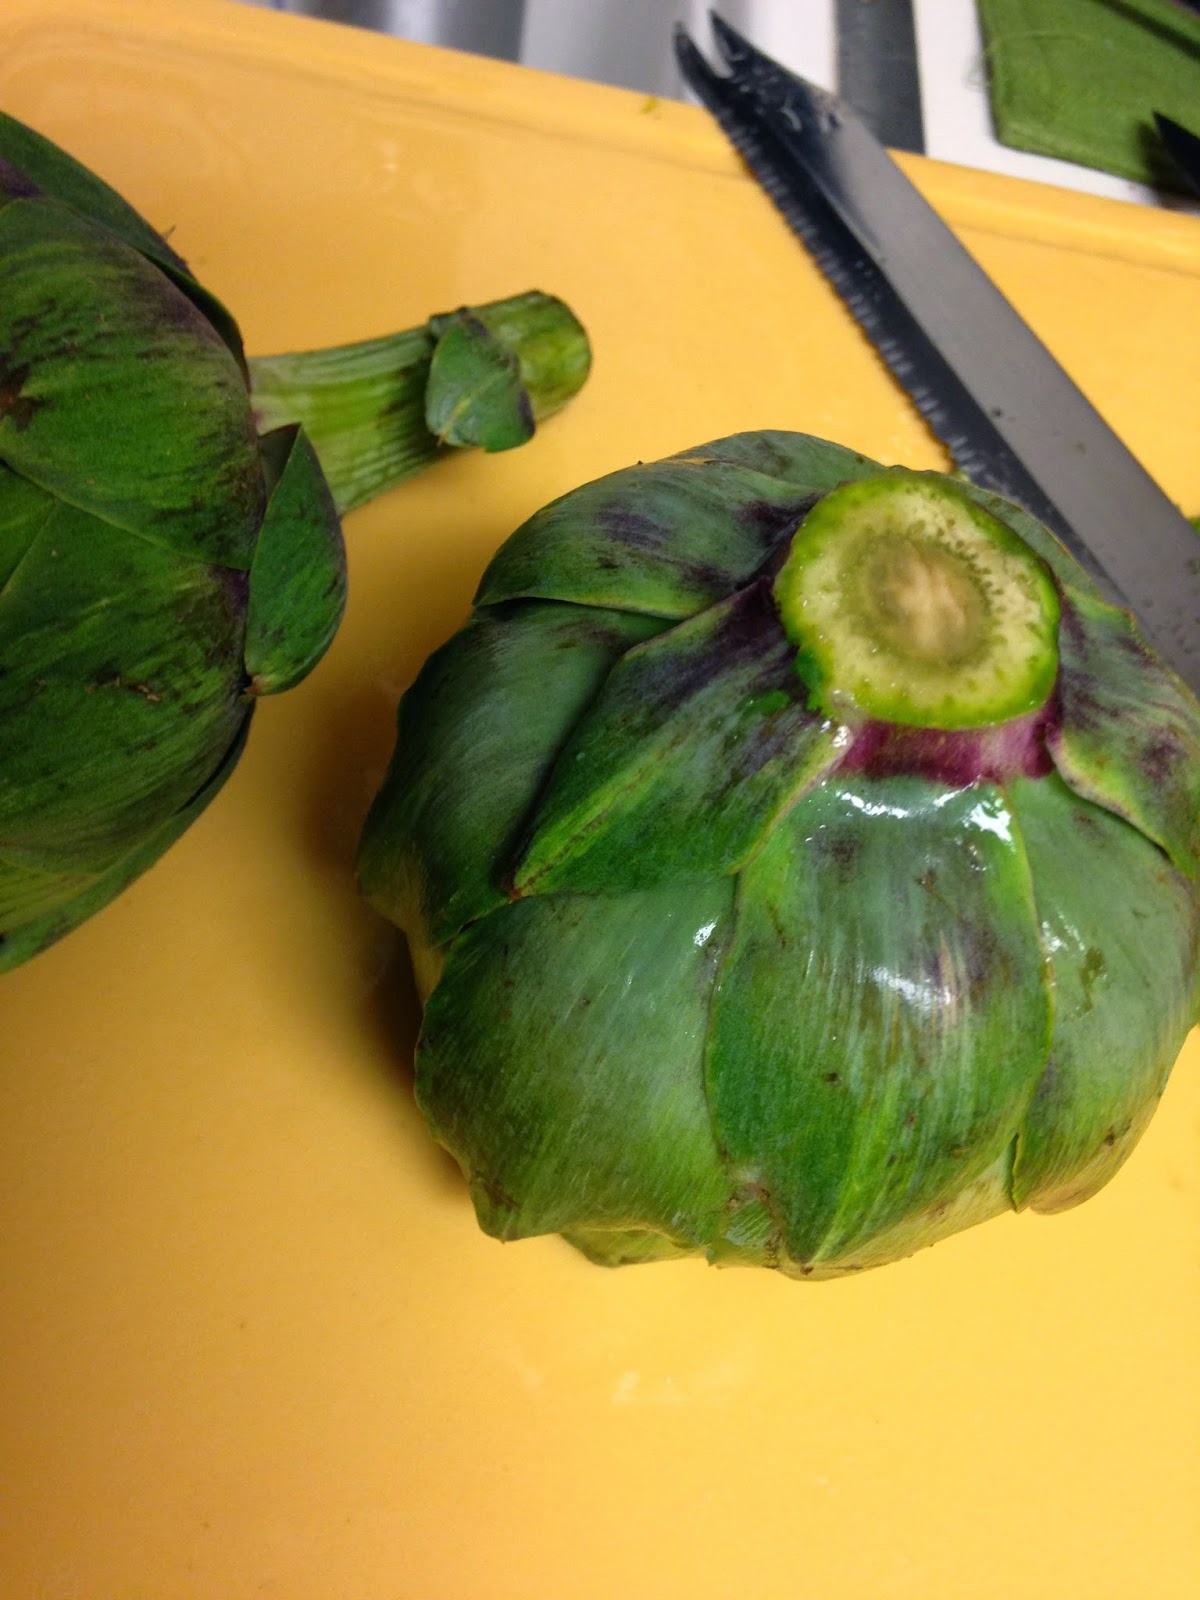
With that in mind, I wanted to start back on Uncovering Food by sharing how I prep a flavorful artichoke that doesn't need any additional condiments, keeping it low-calorie and healthy!
First, wash your artichokes carefully and then cut the top spiny tips off so you have a flat surface. You can't eat this tough part of the plant so you aren't losing any of the good stuff.

You will want to rub the cut part with a lemon to reduce oxidization (browning) and keep the pretty green color.
Then flip that baby over and cut the stem down to the base.
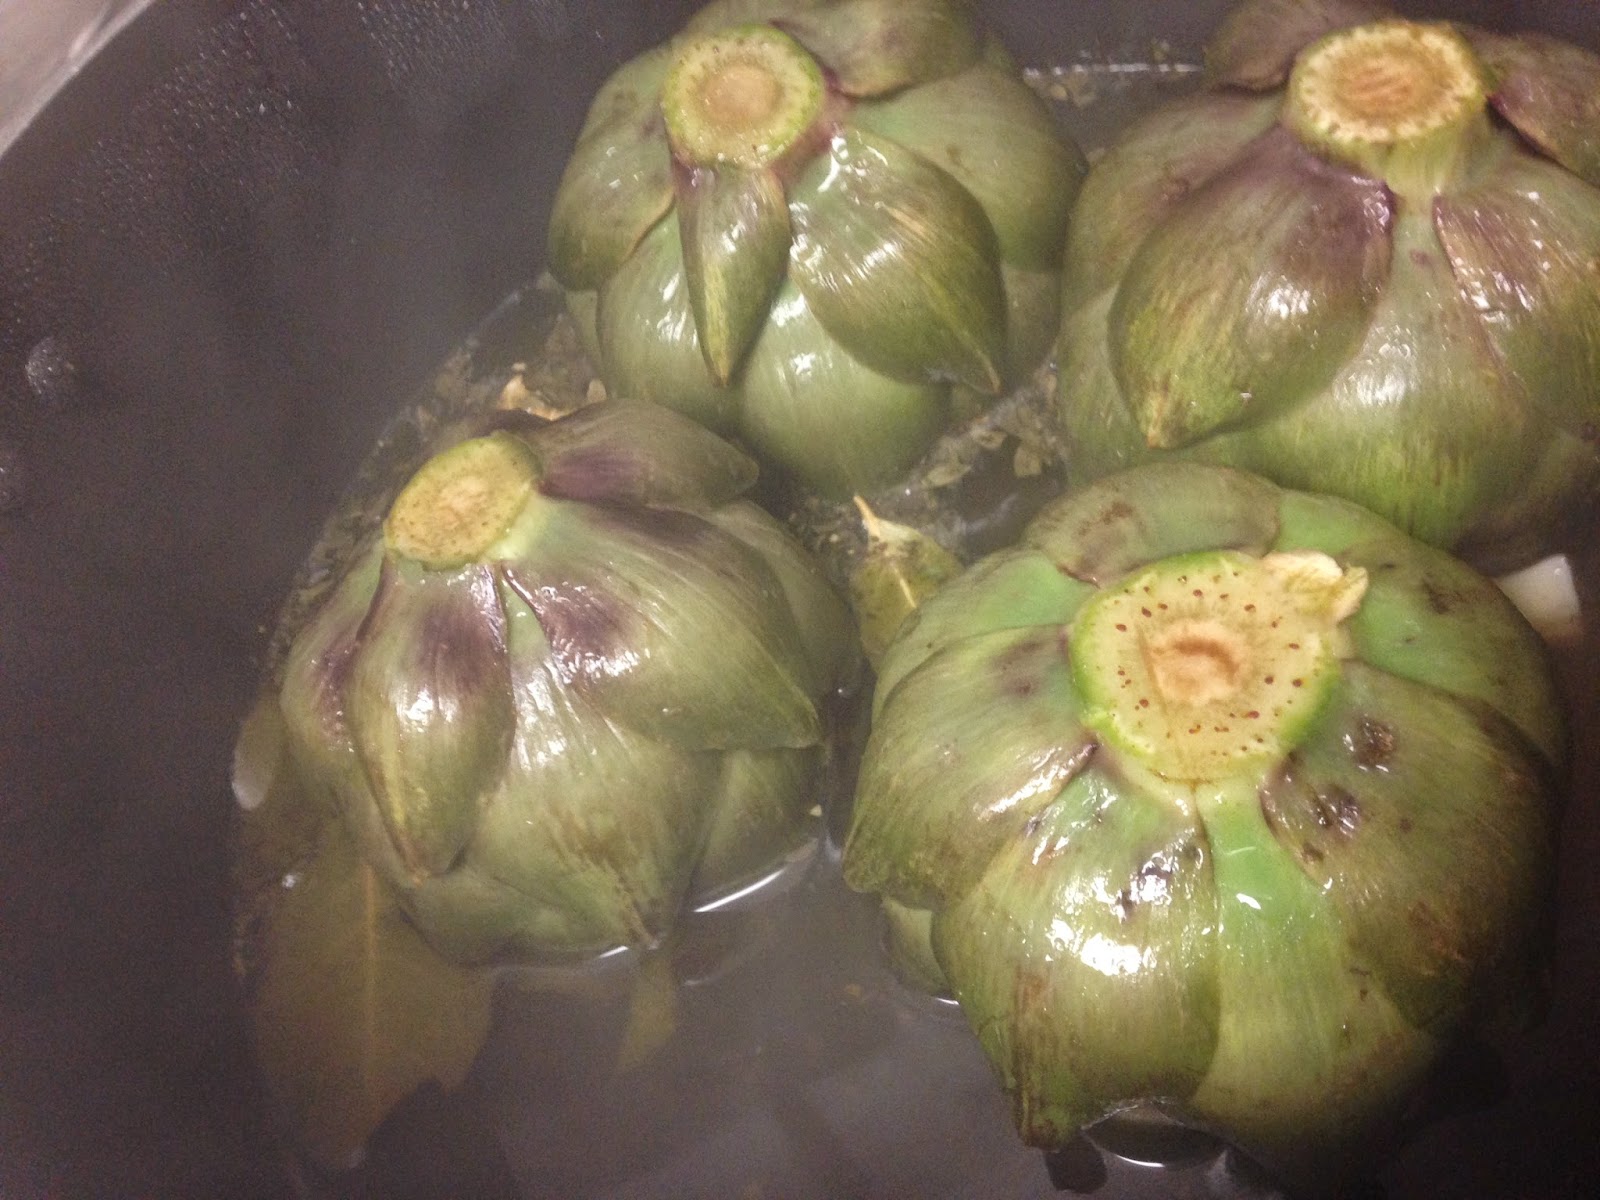
Prepare a stock pot with a broth to water ratio of 1:2 where the liquid will come up about halfway on the artichoke. Add to the liquid in the pot 3-4 bay leaves, 1 tbsp of Italian seasoning, 3-4 halved garlic cloves as well as salt and pepper.
Wednesday, October 3, 2012
Spicy Slow Cooker Almond Tempeh
 |
| Spicy Slow Cooker Almond Tempeh |
It's been a fast-paced start to the school year and this has meant a lot of quick and easy meals. It has also meant a lot of dining out. However, a friend of mine mentioned she was making a tempeh dish in peanut sauce this weekend and it got me dreaming of a dish I made last year and never got to blog!
I am participating in Eating Rules October Unprocessed challenge and so I am trying to make meals that don't require a lot of kitchen prep. Taking the ideas of the dish that was never blogged, amending it to be peanut-free so I could take it to work (I teach at a peanut-free campus), and modifying it to include veggies I could buy pre-prepped... and you get something fabulous!
Spicy Slow Cooker Almond Tempeh
Serves 8
Ingredients
3/4 cup Almond Butter
2 8-oz packages of 3-grain tempeh (or your favorite tempeh)
10-oz shredded carrots
8-oz sliced crimini mushrooms
10-oz peeled, cubed butternut squash
2 red bell peppers chopped into medium pieces
2 tbsp diced ginger
1 tsp cayenne pepper powder (more if you want really spicy, less if you can't handle heat)
2 tbsp soy sauce
1 tsp seasoning salt
1 tsp black pepper
Instructions
Mix everything together in the slow cooker. Cook on low 8-10 hours. The dish will go from liquidy to more liquidy, and will then start to thicken.
Serve over quinoa or rice.
Nutritional Information
Each serving is approximately one cup however it will vary on how long you let the liquid cook down. This is a large portion when paired with a grain, so I am also including nutritional information for a half the serving as well.
1/8 recipe -- 330 calories, 29 carbs, 18 fat, 17 protein, 9 fiber
1/16 recipe -- 165 calories, 14.5 carbs, 9 fat, 8.5 protein, 4.5 fiber
Wednesday, August 29, 2012
Refreshing Tomato, Cucumber, and Bell Pepper Salad
 |
| Tomato, Cucumber, and Bell Pepper Salad |
This recipe can either make 4 portions as a side dish or 2 portions if you really like salad!
Tomato, Cucumber, and Bell Pepper Salad - Serves 4
Ingredients
1 large cucumber (peeled, deseeded and diced)
3 small tomatoes - larger than a golf ball but smaller than a baseball (deseeded and diced/sliced)
1 large scallion (diced)
1 baby red bell pepper (diced)
3 tbsp rice vinegar
.5 tsp toasted sesame oil
1 tsp garlic powder
chili oil
pink sea salt (or your favorite salt)
pepper
Instructions
In a large bowl, toss cucumber, tomatoes, scallion and bell pepper. Set aside.
In a small bowl, whisk vinegar, sesame oil, garlic powder. Add chili oil to taste (I used 5 dashes so there is a small but noticeable kick) as well as salt and pepper to taste.
Toss dressing with vegetables, cover, and refrigerate. You can serve right away however I like to let the dish sit for about 30 minutes to let all the flavors come together.
Nutritional Information (using MyFitnessPal.com to calculate it) for full recipe: 153 calories, 22 grams of carbs, 2 grams of fat, 6 grams of protein and 6 grams of fiber
Tuesday, May 8, 2012
Vegan Chili with Avocado
.JPG) |
| Vegan Chili with Avocado |
Since moving downtown and kicking up the work hours, I have been finding myself spending less and less time in my gorgeous kitchen. Which is completely obvious by the lack of posts the last couple of months, right?
As the school year comes to a close and the realization that I am about to spend my summer living in dormitories hits me, I am racing back to my kitchen to kick it into high gear. However, I still don't have a ton of time during the weekdays. Thus, I am trying to prepare meals that can be reheated throughout the week. This one was a winner so I had to share.
Vegan Chili with (optional) Avocado - Serves 8
Ingredients
1 block of extra firm organic tofu packed in water (14-ounce package)
2 tablespoons chili powder
1 teaspoon ground cumin
2 small red onions, chopped
2 lb frozen broccoli
5 cloves of garlic, diced
1 15-ounce can of no-salt added pinto beans, drained and rinsed
1 15-ounce can of no-salt added black beans, drained and rinsed
1 15-ounce can of no-salt added kidney beans, drained and rinsed
1 28-ounce can of diced tomatoes
1 4-ounce can of chopped chilies
2.5 cups frozen sweet corn kernels
2 large zucchini, diced
Instructions
1. Freeze the tofu. Defrost it fully. Squeeze all excess water and crumble.
2. Lay bag of frozen broccoli out on table. Beat to death with a meat cleaver. Feel better about life and get lots of broccoli crumbs in the process. I guess you could also just defrost and dice it but that's not what I did. My method was both tasty and therapuetic ;o)
3. Heat large stockpot over medium-high heat and brown tofu with chili powder and cumin for several minutes.
4. Add onions and cook for several more minutes.
5. Add remaining ingredients. Stir well. Bring temperature down to a simmer. Cover and let cook for 2.5 to 3 hours.
I mashed up an avocado and spooned some of it on top for a creamy element. Nutritional Information does not include avocado because I'll be honest... I can't measure that goodness!
Nutritional Information for 1/8 of recipe: 296 calories, 2.9g fat, 47g carbs, 14.5g fiber, 17.5g protein
Nutritional Information for full recipe: 2364 calories, 23g fat, 378g carb, 116g fiber, 17.5g protein
Monday, January 2, 2012
Seitan Sausage: A Meat-Loving Father Approves
 |
| Grilled Seitan Sausage on a bed of sweet potatoes, corn, peppers, and black beans |
My family is not vegan. They are not vegetarian. In fact, if I had to described a typical meal growing up, it was definitely meat-centric. However, as the years have passed, I watched my family welcomed more plant-based meals into their lives. Despite eating more plants, my dad remained steadfast that meat was not only delicious, but necessary for daily life.
Which is why I was surprised to see a Facebook status from my mom saying my Dad was eating a stew with seitan in it. It shocked me! My mom claimed that my dad would eat anything, but I just couldn't imagine that tall Hungarian with the bush head of hair and tough exterior sitting down to a vegan dinner.
The thought made me smile, remembering when I was in high school and announced I wanted to be vegetarian. My dad smirked, chuckled, and said that they wouldn't be buying any fancy vegetarian food. I would have to figure it out with what was in the house. So I ate lots of bowls of baked potato with cheese. Not the healthiest way to eat... and eventually I gave up.
Since then, I have learned how to create delicious vegetarian and vegan meals. I thank the bloggers out there who have made it easy for me, and others like me, to learn. And when my mom wanted to prepare something vegan for Christmas, I sent her links to some of these fabulous blogs.
My mom opted to make Seitan Roast Stuffed with Shiitakes and Leeks from the Post-Punk Kitchen. She served it up and both my dad and uncle scooped some up. I think they thought it was a stuffing roll? They loved it! And my mom was turned on to a new food product.
I forgot how delicious homemade seitan was. And so using the base recipe from PPK for the seitan, I began to play around over my holiday break. The following is the recipe for seitan sausages I ended up with. The sausages are full of flavor and have a multitude of uses from eating as is, to adding to pasta sauces.
Seitan Sausages
Makes 16
3/4 cup canned white beans
4 cloves of garlic
1 1/2 cups low-sodium vegetable broth
3 tbsp low-sodium soy sauce
2 tbsp olive oil
1/2 tsp liquid smoke
2 cups vital wheat gluten
1/3 cup nutritional yeast
1 tsp fennel seeds
1 tsp smoked paprika
1 tsp dried sage
1 tsp dried thyme
1/4 tsp black pepper
Using a mortar and pestal (or a sandwich bag and hammer), blend the fennel seeds, paprika, sage, thyme, and pepper. You don't want to grind the seeds into a powder, but just break them up a bit.
Pre-heat oven to 350 degrees. Cut foil into 16 squares about 8x8 inches.
In a food processor, using a metal blade, blend beans, garlic, broth, soy sauce, oil, and liquid smoke. This may take a couple of minutes to break down the beans and garlic. In a separate bowl, mix vital wheat gluten, nutritional yeast, and spice blend.
Switch the metal blade out for the dough blade. Add dry mixture in batches to wet mixture and knead. You can also do this in a mixing bowl if you don't have a dough attachment.
Divide the dough into 16 balls (I weigh them for consistency). Roll each dough ball into a long tube. Wrap the tube tightly in foil, like rolling a tortilla of foil around it. Twist the two open ends of the roll shut. You want the roll to be tight, or the shape will not hold when cooking.
Bake for 40-50 minutes until desired doneness. You want a firm skin and depending on your taste will decide how firm you want the sausage through the middle. You can press firmly on the outside of the roll to determine doneness.
Each sausage: 105 calories, 2g fat, 7g carbs, 1g fiber, 14g protein
Thursday, December 8, 2011
Blackberry Rosemary Wheat Focaccia
 |
| Blackberry Rosemary Wheat Focaccia |
There is something about a rich doughy bread topped with jammy berries that screams - WINTER TREAT to me. So when Driscoll's Berries invited me to bring a recipe to an event they were hosting last week, I knew immediately what I wanted to attempt. This recipe is jammy, sweet, savory, and salty. What more could you ask for at a holiday party?
Last summer, Carolyn Jung (aka FoodGal) posted a killer recipe for a Cherry Focaccia with Rosemary which I proceeded to make for a wine party. It disappeared faster than the wine! Seriously, go make this recipe!
I thought that with the blackberries, the dough needed a more earthy flavor. Plus I love to try to increase the health benefits of whatever I make. So I played with the recipe a bit, changed up the flours and oil amounts, and came up with a focaccia that has more fiber in it from the wheat flour. Using Carolyn's recipe as the base, this was the most I could increase the wheat flour and the lowest amount of oil I could use without losing the focaccia texture. I plan on continuing to play with it but this recipe was quite tasty :o)
Fair warning. This focaccia needs lots of time to sit and rise. Plan ahead if you want to make it. I tend to start it in the morning so I can do the later rises and baking in the evening.
One note about the awesomeness of Driscoll's Berries that I discovered in my own research about the company is that they have a program where you can find out where your berries were grown! There is a "Harvest Mark Code" located in the right corner of the bar code and you can enter that code on their MyDricolls Web site to find out where your berries were grown along with other interesting information about your berries.
Full disclosure: I was given the blackberries by Driscoll's Berries to make this dish for their event. I was not paid or asked to write about the berries or the company but I do love the company and was excited to share this with you!
Blackberry Rosemary Wheat Focaccia
Makes 20 total servings between the two 9-inch pie pans
1 pkg dry yeast (instant)
1.5 cups room temperature water
2 cups bread flour
1 cup whole wheat flour
1.5 tsp sea salt
1/2 tsp cane sugar
8 tbsp unfiltered olive oil
2 cups Driscoll's blackberries
4 fresh rosemary stems full of needles
coarse sea salt
The first step is to make a biga. Biga is a type of pre-fermented dough that adds complexity to the bread as well as adding a unique nutty component to the flavor profile. It also helps lengthen the life of your bread, but the bread is so tasty you probably won't need to worry about it sitting out long!
To make the biga, mix the yeast and water together in a metal bowl. After the two have blended, add in one cup of the bread flour and cover with plastic wrap. You will want to place this in the fridge for 12 to 15 hours according to what I have read about making a good biga.
When you have let your biga ferment long enough, bring it back to room temperature. This will take 45 minutes to an hour.
You are now ready to prepare the dough! Mix the biga with the remaining bread flour, the whole wheat flour, the 1.5 teaspoons of fine sea salt and the cane sugar. You can use a mixer with a dough hook or a good wooden spoon.
Spray a seperate mizing bowl with non-stick cooking spray and put dough in this bowl. You will want to stretch the dough up and over itself repeatedley, hand-kneading to get a satin consistency. Cover and let rise until doubled in size. For proper conditions, you want to place your dough in a warm place free from breezes. I like to put mine in my oven with the oven light on and the door to the oven left ajar.
The dough should take about two hours to double in size although it could take as little as 90 minutes. While the dough is rising, pour two tablespoons of olive oil into each of your two metal pie pans. Using your fingers, spread the oil around the inside of the pan. Divide the dough into the two pans and using your fingers, press the dough into the pan. Cover the dough for the final rising which will take about an hour.
While the dough is rising, preheat the oven to 400 degrees (please don't put the dough in the oven this time for the rising!). Dimple the dough with your fingers (be careful not to push too hard and cause the dough to collapse!) and then remove the needles off of the rosemary stems and sprinkle the needles over the dough. Drizzle two tablespoons of oil over each dough loaf. Finally, sprinkle a light coating of the coarse salt over the dough.
Bake the dough for four minutes or so and then remove from the oven. Gently place the berries over the dough, pushing them down slightly. Pun pans bake into the oven and bake for 22-26 minutes. Cool in pans on wire rack before serving.
Nutritional Information:
Per slice (if divided into 20 servings): 115 calories, 5.8g fat, 14.7g carbs, 1.9g fiber, 2.6g protein
Total Recipe: 2295 calories, 116g fat, 294g carbs, 38.6g fiber, 52.4g protein
Friday, November 11, 2011
Travel-Friendly Energy Bites
 |
| (Photo courtesy of Andrew Wilder at Eating Rules) |
By the time Thanksgiving rolls around, I will have been on the road almost every weekend for two months. The life of a debate coach is a crazy one. Toss in the food blogging shenanigans at the International Food Bloggers Conference (IFBC), and I feel like I am gone more than I am home.
However, with time changes and quick layovers and late nights, sometimes I find myself without a healthy option for a quick bite. So I have been playing with a base recipe for granola bars that a friend gave me on a handwritten notecard. I modified it a bit to play with different flavors and hopefully amped up the nutritional profile just a bit.
Play around with what you choose to mix in and what nut butter you want to play with. This recipe makes about 36 1" by 1" squares but you can size it up however you want. The nutritional information below are for the specific name brands I used. Feel free to request the names if you want them or calculate your own nutritional stats.
Energy Bites
Yields: 36 bites
1/2 cup almond butter
3/4 cup brown rice syrup
2 tbsp cane sugar
2 tsp vanilla extract
3/4 cup reduced-fat unsweetened coconut shreds
1/2 cup dried goji berries
1/4 cup ground flax seeds
1/4 cup hulled hemp seeds
1/4 cup white sesame seeds
1 1/2 cups gluten-free oats
1 scoop Garden of Life protein powder
Combine brown rice syrup, almond butter, vanilla extract, and cane sugar in a small saucepan. Bring to a slow boil over medium heat and then reduce the heat. You want to make sure the nut butter has melted and the sugar has dissolved.
Combine coconut shreds, goji berries, flax meal, hemp seeds, sesame seeds, oats, and protein powder. Pour in liquid mix and stir until combined. I tend to knead the mixture by hand towards the end to make sure everything is combined.
Grease a 9X9 baking pan or use wax paper (I do both). Put "dough" into the pan and press it flat. Let harden (I toss it in the fridge to speed up the process). Remove from pan, cut into squares, and wrap in wax paper.
Per serving: 90.6 calories, 3.7 grams of fat, 11.8 grams of carbs, 1.6 grams of fiber, 2.5 grams of protein
Full recipe: 3263 calories, 134 grams of fat, 425 grams of carbs, 57 grams of fiber, 89 grams of protein
Friday, October 28, 2011
Peanut Butter, Kidney Bean, and Yam Stew
 |
| Peanut Butter, Kidney Bean, and Yam Stew - Do you know how hard it is to photograph late at night?!? |
I love a good stew and I love peanut butter, so this summer when I had an opportunity to try some peanut butter stew, I was in LOVE! The stew was made by one of the administrators at the residential debate camp I was teaching at and she made it in a slow cooker. I kept meaning to ask for the recipe and I am sure at one point she even told me where she got her inspiration... but as the summer wound down and school picked up, I forgot to ask. However, I never forgot that stew.
This weekend while in Alaska, I was reading Colleen Patrick-Goudreau's The 30-Day Vegan Challenge, I found a stew that sounds like it had a similar flavor profile as the stew I enjoyed this summer although slightly different. So I took the recipe from this book, along with what I remembered from the summer stew, and modified it for my slow cooker. The resulting stew was creamy, sweet, spicy, salty. A mouthful of flavor and texture that tasted even better the second day!
While you can probably sub in sweet potatoes (and in some parts of the country yams are more difficult to find), I am a fan of the drier and more starchy yam. According to the Library of Congress, here are the differences!
 |
| The stew in a different lighting attempt! |
Makes 10 1-cup serving
2 medium yellow onions, peeled and chopped
2 red bell peppers, deseeded and chopped
3 yams, cubed (I keep the skin on and scrub them well before cutting them)
5 cups of water
2 cubes of vegan vegetable bouillon cubes (you can replace these and the water with 5 cups of vegetable broth)
1 can (15-ounce) of kidney beans, rinsed and drained
1 can (15-ounce) of diced tomatoes
1/2 cup of creamy peanut butter
1 tbsp minced garlic
1 tsp minced ginger
1 tsp cumin
1 tsp ground cinnamon
1 tbsp brown sugar
1/2 tsp chili powder
1/2 tsp sea salt
Mix all ingredients in slow cooker and cook on low for 8-11 hours (I say 11 because that's when I got home and enjoyed it!).
When I calculated the WW pointsplus points for the items that have points (yams, bouillon, kidney beans, peanut butter, brown sugar) I got 5 points per serving.
Monday, September 5, 2011
Small Batch Vegan Banana Bread

I love baking. And eating baked goodies. But living in a small household spells trouble when I pull out the loaf pans and announce my desire to bake. Especially when that desire is for banana bread, since I am the only one at home who likes banana in my baked goods. So I played with a variety of recipes and tweaked a combination of a couple in order to create this small-batch vegan banana bread. It made two mini loaf pans which meant one to enjoy and one to share!
In order to get the breakfast (dessert?) I shared in the picture, just cube up one half of a mini loaf of banana bread and served it over some grilled pineapple spears with a dollop of your favorite dairy or non-dairy yogurt.
Small-Batch Vegan Banana Bread
(makes two mini loaves)
2 2/3 tbsp brown sugar, loose
2 2/3 tbsp white sugar
2 2/3 tbsp Earth Balance Vegan buttery spread (or your margarine of choice)
1 ripe banana, mashed
1 1/3 tbsp unsweetened almond milk mixed with 1/3 tsp apple cider vinegar
1/3 tsp vanilla
2/3 cup all-purpose flour
1/10 tsp baking soda (you can use 1/8 of a tsp but it has a slight after taste, in my opinion)
1/2 tsp pumpkin pie spice
dash of salt
Preheat oven to 350 degrees. Grease two small loaf pans and set aside.
Mix flour, baking soda, pumpkin pie spice, and salt. Set aside.
Cream sugars and margarine together. Add banana, almond milk mixture, and vanilla. Mix until blended.
Slowly add flour mixture to wet mixture until it has been combined.
Pour into loaf pans and bake for 45-60 minutes depending on your oven (mine took 45 minutes but a friend who tried it said it took about an hour in her oven). You want the bread firm with a toothpick coming out clean, but you want to prevent it from drying out.
Using Weight Watchers PointPlus, this recipe comes out to 6 PP per 1/4 of the recipe.
Sunday, June 26, 2011
Cinnaholic: Cinnamon Roll Addiction Defined
 |
| Chocolate Chip Cookie Dough Cinnamon Roll from Cinnaholic |
There is something about the smell of a fresh baked cinnamon roll that relaxes the soul and brings a smile to the face of this exhausted debate teacher. After teaching every day for seven days straight and listening to numerous debates about space exploration, I needed a dosing of dessert. Consulting Yelp for assistance in my quest, Cinnaholic stood out as a must-hit after reading rave reviews and scoping out the Yelp-mobile special offer.
Located in Berkeley, at the base of the Cal campus, Cinnaholic offers some of the best tasting cinnamon rolls that have graced these lips. Colleagues who have had the opportunity to dine with me this weekend, were also surprised to learn that everything at Cinnaholic is vegan! And there are a lot of ways to customize these fabulous treats.
You can order the basic roll and top it with a variety of icings and toppings to make your own fun combinations. My first roll was topped with a hazelnut icing which complimented the subtle cinnamon notes and doughy goodness, packing a full-flavor punch. I polished that first roll off in a matter of minutes! No, seriously, while my colleague waited for his roll to bake (they really do make them fresh for you) I managed to polish mine off and even contemplated licking the box. Note that if you have the Yelp mobile app and check-in at Cinnaholic, they currently have an offer for a free icing or topping!
The toppings are also quite fabulous. I ordered a specialty roll today which included several of the toppings off the menu. The Chocolate Chip Cookie Dough roll has icing, chocolate syrup, chocolate chips, and a vegan cookie dough on top. The toppings melt into the roll making each sweet doughy bite a flavor explosion of cookie and cinnamon roll. This roll was so rich, I could only finish half of it in one sitting and am saving the rest for late night snacking. The specialty menu also includes some other flavors I can't want to nosh on like Mocha Almond and Rocky Road.
In addition to the basic roll, the design-it-yourself options, and the specialty rolls, Cinnaholic also has Specialty Pie Rolls complete with a brown sugar & oatmeal crumble on top. And if you can't finish off the full size roll, there are Baby Buns (mini versions of the full-size rolls), cookies, and brownies. And if you only want a bit of sugar, you can buy frosting by the shot!
Make sure you grab a frequent punch card, even if you think you will only have one roll. After one bite, you will be back again and again for more!
Can't make it to Berkeley to enjoy the goodness? After scoping out their Web site, I learned that you can also order Cinnaholic products online! However, if you can get out to the East Bay, Cinnaholic is open from 10 a.m. to 7 p.m. Tuesday through Sunday (closed on Mondays) at 2132 Oxford Street.
Tuesday, May 17, 2011
Spicy Southwestern Barley Bean Maki

There is just something about sushi that makes me smile. I don't know if it is the cute little pieces of maki or fun with chopsticks, but I love sushi! So this week when I made a big batch of barley and cooked up a pot of dry beans, I decided to mix it up a bit. Throw in fresh spring onions from my CSA, some spices, Garlic Gold, and pickled jalapenos... wrap that all in nori... and suddenly dinner is made and I have that sushi smile on my face.
This recipe calls for my own version of refried beans which I will explain how to make below. It also includes the addition of diced jalapenos. You can add as much or as little of the jalapeno as you want. The pickling juice adds tang to the dish and the peppers give it a small kick and add crunch, so I wouldn't eliminate them entirely! Instead of rice, I made Bob's Red Mill Pearl Barley according to directions. It was easy-peasy and adds a unique texture and flavor to the rolls. When it comes to beans, you can use canned beans if you want, however I just make a pound of dry pinto beans in the slow-cooker with a piece of kombu which is an inexpensive way to get a lot of beans!
I didn't include serving size because I ate the entire dish myself. However, I guess it could serve two if you are willing to share ;o)
Spicy Southwestern Maki
4 pieces of nori
1 cup pearl barley, cooked
1 recipe of Jalapeno-Garlic Refried Beans
1/4 cup pickled jalapenos, diced (or less!)
Using a bamboo mat, pat a thin layer of barley on one side of the nori. Form refried beans into a thin snake and place on top of barley. Add diced jalapeno and roll. If you have never made your own sushi before, The Sushi FAQ has a great pictorial step-by-step guide to making maki.
Jalapeno-Garlic Refried Beans
1 tsp Garlic Gold olive oil
1/4 cup diced fresh spring onion
1 cup cooked pinto beans
1/4 tsp cumin
1/2 tsp chili powder
1/4 tsp salt
1/2 tbsp jalapeno pickling juice
Heat oil in a small frying pan and add onions. Cook for 2-3 minutes until onions start to wilt/yellow. Add beans and spices (everything except pickling juice). Cook for an additional 3-4 minutes, stirring. Remove from heat, add juice, and mash with a fork or potato masher.
Thursday, April 14, 2011
Slow-Cooked Adzuki Beans with Butternut Squash

I will be the first to admit I had no idea how to spell Azuki (Adzuki?) and I have only ever had these beans in sweet Asian desserts. So when I tasted a stew over Spring Break that incorporated these small red beans, I knew I had to play with them at home. I bought some dry beans from the bulk section of Whole Foods and decided to play around with a couple of preparations. This stew is easy to make and lets the real flavors of the ingredient shine however some people may find it too tame or bland if you are used to heavily spiced foods. You can play around with the seasonings as desired and maybe even switch up the squash with another varietal or vegetable!
Adzuki Beans with Squash and Wakame
1 cup dry beans
1 or 2 four-inch pieces of dried wakame seaweed
1 lb cubed butternut squash
1 tsp ancho chili powder
1 tsp soy sauce
Soak beans and wakame overnight in slow-cooker vessel. Drain liquid. Pour fresh water until it is barely covering the beans and seaweed. Cook on low for 4 hours. Add squash and seasonings and continue cooking on low for 4 more hours. Enjoy!
One-fourth of the mixture is approximately 150 calories, 0 grams of fat, 30 grams of carbs, 6 grams of fiber, and 8 grams of protein
Thursday, March 10, 2011
Collard-Wrapped Sweet Potato and Black Bean Hash

It's just a big green leaf but it was new to me this year. The Collard Green in it's raw and fresh form is something I had never purchased nor made but it's been popping up in my CSA pick-up almost every week this season and after preparing it in all of the ways I had prepared canned or frozen greens, I decided it was time to try something new (to me). I have had tacos with lettuce shells so why not a wrap with a collard green "tortilla"?
For those of you not familiar with the giant green leaf, it is actually a nutritional powerhouse. According to the Whole Foods Web site, these greens can help lower cholesterol and may protect against cancer. They are low in calories but high in vitamins K & A (among other great things!). So using them in place of a high-processed, carb-loaded wrap means you can up your nutrients while reducing your waistline.
To prepare the "wraps" you will want to first remove the fibrous stem from the collard leaf. Cut far enough into the lean to remove the coarse part of the stem but not so far you destroy the tortilla appearance. You will then want to blanch it in boiling water for 3-5 minutes until the leaves become pliable. Immediately following the boiling bath, give them an ice water bath and set aside to fill with your fillings of choice.
I filled my collard wraps with a quick and easy hash. I heated up some avocado oil, added half of a diced white onion and a diced sweet potato. Cooked these with some garlic powder, chili powder, sea salt, and black pepper. Then added some canned black beans when the potatoes became tender. Easy, simple, and you can adjust the ingredients according to taste.
Monday, November 29, 2010
Aji Cereza Chili Pumpkin Soup with Red Quinoa and De Arbol Chili-Spiced Pepitas

While driving home from the airport last week and trying to not lose my mind in the Bay Area traffic, a commercial encouraging listeners to "Spice up the holidays!" caught my attention. I had received a sample of dried peppers from Marx Foods this month to use in their "A Spoon & A Chili" recipe contest and I was still pondering what to make. At the same time, I was yearning to make a vegan pumpkin dish that wasn't a pie, for the holidays. As the traffic started moving again and the music began to flow over the airwaves, an idea had formed. Why not combine the flavors of the sweet woodsy pumpkin with the spicy earthy peppers for a dish sure to warm anyone up on a cold winter day?
Now to fit that warmth on a spoon...
This dish is a complete meal in a bowl, bringing the nutty flavors of red quinoa together with the sweet pumpkin and spicy Aji Cereza peppers. The Aji Cereza is a Peruvian pepper that's only slightly less spicy than an Habanero pepper measuring in at 75,000 Scoville units (the index used to measure the heat of a pepper). Marx Foods sells an organic version of this pepper which is pictured above (it's the cute little one that looks like a cherry!). I also played with the milder De Arbol chili (the long skinny chilies above) to make a salt which was used in roasting the pepitas. You can make this dish without the seeds, and I almost did (because I almost ate them all prior to serving... they were just that good!) but they add another flavor and texture to the dish which I enjoyed.
I chose to roast my own sugar pumpkin, but you could also used canned pumpkin. If you are roasting your own, just cut it in half, seed it, and bake it at 375 degrees for 60-90 minutes. You can also opt to use different milk substitutes but recognize this may affect the nutritional information. This soup freezes well, although the quinoa did not fare as well being reheated, so I would recommend making a smaller batch of quinoa fresh for each serving rather than freezing a larger batch.

Aji Cereza Pumpkin Soup with Red Quinoa & De Arbol Pepitas
Serves Six
Aji Cereza Pumpkin Soup
1 tbsp organic canola oil
5 cloves of garlic (sliced thin)
1 tbsp organic onion granules
2 organic Aji Cereza chili peppers (soaked, deseeded, diced)
2.5 cups mashed pumpkin (approximate yield from one medium sized sugar pumpkin)
1 tsp salt
.25 tsp black pepper
8 oz. vegetable broth
12 oz. light soy milk
Heat oil in a deep pan over medium-high heat. Add garlic, onion, and chili peppers. Cook for one to two minutes until garlic begins to brown. Add pumpkin, salt, and pepper. Cook for another three to five minutes until pumpkin begins to bubble. Add broth and soy milk and stir to combine. Reduce heat to low and simmer for ten to fifteen minutes. Use an immersion blender or blend soup in small batches and continue to simmer for another ten minutes. Pour around cooked quinoa in bowl.
Red Quinoa
1.5 cups red quinoa
3 cups water
Combine red quinoa and water in saucepan. Bring to boil and then cover and reduce heat to simmer for ten to fifteen minutes (until quinoa has absorbed the water).
Spiced Pepitas
Pumpkin seeds from one pumpkin
2 De Arbol chili peppers
1 tbsp pink Himalayan sea salt
Blend chili peppers and sea salt together. This will make more powder than you need so store the rest in an airtight container for future use.
Preheat oven to 375 degrees. Grease a baking pan with your preferred method (I brush canola oil lightly on the pan). Layer seeds in a single layer on pan. Sprinkle with seasoning salt and bake for 10-15 minutes, stirring the pan once during the baking time. Store extra seeds in airtight container and enjoy as a snack.
*********
Nutritional Information for 1/6th of soup -- 70 calories; 3 grams of fat; 10 grams of carbs; 3 grams of fiber; 2 grams of protein
Nutritional Information for 1/6th of quinoa -- 156 calories; 2.6 grams of fat; 27 grams of carbs; 3 grams of fiber; 6 grams of protein
Nutritional Information for 1 tbsp of pumpkin seeds -- 18 calories; .8 grams of fat; 2.1 grams of carbs; .7 grams of protein
Thursday, October 28, 2010
CSA Box: Eggplant, Tomato, Basil, Kale, Okra, Radish, Garlic, Arugula, Onion

This week my CSA box screamed BAKE ME. Maybe it was the small sample loaf of multi-grain bread from a local bakery, Bread and Bun, that was included this week. Or maybe it was the lack of vegan calzones in the freezer. Or perhaps it was just the dizzying array of fresh goodies in this week's box. In addition to the bread, this week included:
- Thai Basil
- Italian Eggplant
- Red Russian Garlic
- Arugula
- Red Russian Kale
- Long Red of Florence Torpedo Onions
- Okra
- Easter Egg Radishes
- An Heirloom Tomato
- A Slicing Tomato
Since I had extra trays in the dehydrator, I decided to slice the heirloom tomato thin, lay it in a single layer on the tray, and sprinkle it with Italian seasoning. Now I also had herbed tomato chips! These were super yummy as an evening snack a plane trip.
I also fell back on another favorite. I made Okra Fries with the small bag of okra pods. To answer a question from last week, baking the okra in this method doesn't leave them super slimy. They are soft on the inside but crisp on the outside which I think helps.
It may not be a real "calzone" but I used a number of ingredients to make 8 vegan sandwich pockets which then were individually wrapped and frozen for quick lunches and dinners. Using the dough recipe from these pockets, I diced the eggplant, sprinkled it with salt and let it sit for 20 minutes. Meanwhile, I sauteed the onions and garlic (which I had diced) in organic canola oil. I squeezed the excess liquid from the eggplant and added it to the pan. Then the slicing tomato was added along with the basil. I added nutritional yeast after cooking and filled the dough with the prepared mixture then baked according to the instructions.
The arugula and garlic was used in a cold barley salad. I cooked the barley with some of the garlic then tossed it with an unfiltered olive oil and lemon juice vinaigrette along with peas, cherry tomato quarters, and the arugula. The leftover arugula became a simple green salad that paired nicely with the pocket sandwiches.
The radishes and onion were so pretty, I had to make another salad! This one involved slicing the radishes, an onion, and an English cucumber thinly. I sprinkled them lightly with salt and then pressed the water out of them. I made another dressing with olive oil and red wine vine and some of the dried chili peppers from last week and tossed the vegetables in the dressing.
If I didn't enjoy making my own bread, I would definitely order more from Bread and Bun. This multigrain loaf became my afternoon snack for several days. I would slice a couple of thin slices off the bread and put creamy almond butter and Nutella on it. So tasty!
Wednesday, October 20, 2010
Spicy Baked Okra Fries

Okra is in season in my area, as evidenced by the baggie full of pods that appear weekly in my CSA box. I love okra prepped in lots of ways, but this is one of the simplest ways to enjoy them. Serve as a side dish or snack (or in my case, breakfast on the way to the airport last week!). Warning that the larger pods do not fare well in this preparation because they tend to be tougher and have fibrous strings.
Spicy Baked Okra Fries
A dozen okra pods, each about 2 inches in length
2 tsp organic canola oil
1/2 tsp sea salt
1/2 tsp chili powder
1/2 tsp crushed dried red pepper
Preheat toaster oven (I use it to save energy for this single serving snack) to 400 degrees. Toss okra in oil to coat. Sprinkle salt, chili powder, dried red pepper over okra. Bake for 8-12 minutes until it is as brown as you would like it. This takes a couple attempts. I like it lighter brown as opposed to darker in color. Unfortunately I made this last batch in the kitchen before the sun rose, so with the lighting it is hard to tell.
Makes one serving. 69 calories, 4.5 grams of fat, 3 grams of fiber, 2 grams of protein
Wednesday, October 13, 2010
Easy Pear Chips in the Dehydrator

I was one lucky blogger last Friday at BlogHer Food when the USA Pear Council was packing up their table and offered me a giant glass vase full of pears. There were many varietals of pears and my mind was a flurry with everything I could do with them. With travel plans in my near future, I knew the first thing I had to make was travel friendly fare: Pear Chips!
If you had the chance to meet me at BlogHer Food, you may have had a chance to sample kale chips or several other dehydrator experiments that are in the works. Confession: I am glad no one is around to sample these pear chips because they are just so darn good! The vitamin C tablets help prevent discoloration. The darker chips below are a varietal that has more natural pigment than the other chips.
 |
| Pear Chips made from several pear varietals. Regular chips on the left and cinnamon chips on the right. |
Dried Pear Chips
Four Semi-Ripe Pears, peeled and sliced 1/4 inch on a mandolin
6 Vitamin C Tablets, crushed
Water
Ground Cinnamon (optional)
Mixed vitamin C tablets with water. Add sliced pears and soak for ten minutes. Remove slices and pat dry. Lay on dehydrator trays in a single layer, do not overlap! You can sprinkle the slices lightly with cinnamon.
Dry at 135 degrees for five to seven hours until you reach desired crispness. Store in airtight container away from light. If you even get around to storing them :o)
Makes two servings: 141 calories, 7.5 grams of fiber
Tuesday, October 12, 2010
Final Reflections on the Vegan Challenge & a Winner!

I wanted to tell you that I had made up my mind on this vegan challenge. I wanted to tell you that a vision came to me and everything made sense. I wanted to tell you that I have a label whether it be vegan, omnivore, etc.
But none of that is true. Unless the label is "confused consumer of good food."
Last week, before running off to food blogger and marathon events, I wrote about how I had taken on a 21-day vegan challenge for health reasons. I wrote about how much energy I had and how amazing I felt. And then I wrote about how I would spend the next week testing my body out. Trying different foods I had eliminated and re-inviting them back into my life.
On Wednesday, I tried homemade bacon brittle. It was delicious with a warm familiar flavor I had been missing for three weeks. I only had a small bite but I loved it.
On Thursday, I tried a lamb meatball. It was flavorful, well-crafted. But, I could live without it. I also had cheese in a salad that was creamy and just as sweet and I remembered. But I almost wished it wasn't there masking the flavors of the fresh produce on the plate. I also had Greek yogurt panna cotta. Creamy but almost too rich. And that night my stomach rebelled and I wished I hadn't tried any of it. It wasn't worth how I felt the next morning.
On Friday, I ate primarily vegan. Fearing what my body would do if it was forced to each the entrees sponsored by Kraft cheese, I ate vegetables and whole wheat pasta and fresh fruit. That evening, I has a small potato cake with a slice of salmon. Oh how I had missed salmon. I also had a mini duck slider. It was sweet and just as I had remembered duck, but I could have survived without it. And I avoided the multiple cheese tables like a cat runs from water. My stomach, although cheese free, was angry at the end of the evening even if my tongue enjoyed the journey.
Over the weekend, I had cheese one more time and also ate sushi. The cheese fought with my body but my body embraced the fish. I was torn and confused on what to avoid and what to embrace, eating a primarily vegan diet but tasting animal products when my body was willing to try them.
Ultimately, a week later, I have decided that a primarily vegan diet is what suits my body. I may slip up and have some salmon nigiri or a piece of bacon brittle, but I am okay with that. I won't call myself vegan, but I will ask for vegan options on the menu. The label doesn't suit me but I love the food! I respect those people who make food choices based on ethical reasons. This weekend I spoke to vegans and vegetarians who all have different standards on what they will and won't eat and their reasons all varied. It impressed upon me that food selection is subjective. For example, I avoid over-processed foods and try to eat locally because these are movements I believe in and can support but I recognize I am not perfect. Ultimately the food choices we make are as individual as our fingerprints.
***
While I am willing to mail out (loan) my personal copy of "Breaking the Food Seduction" out to people who want to borrow it (email me), the winner of the new copy is StreamingGourmet. Congratulations and please send me your information!
Tuesday, October 5, 2010
Reflecting on 21 Days of Vegan Eating and a Giveaway!
Before I start, I just wanted to take a minute to thank everyone for voting for Uncovering Food to advance to round three of Project Food Blog. You voted for a dinner party and I hope I delivered! Voting is now open for this round and I hope you will give me a chance to show you the sweeter side of Uncovering Food in round four! Voting is open until Thursday at 6pm PST.

If you have been reading Uncovering Food over the last three weeks you probably noticed references to the Physicians Committee for Responsible Medicine and their 21-day vegan kickstart. I picked up Dr. Neal Barnard's book in early September because the title caught my eye. Who doesn't want to read about food seduction? The book addressed how different foods interact with the chemicals in our bodies, including our brains. I hate to spoil the ending, but the recommendation was for readers to try an animal-product free diet for 21 days (I bet you didn't see that one coming!).
I have read a lot of health books over my life time and rarely feel compelled to act on their suggestions, but this book was well written and the research convinced me to try it out. Especially the chapter about how the chemical properties of cheese interact with some people. So I took on the challenge! Today is day 21 and after the questions friends and readers have asked about changing my diet, I thought a reflection was in order and so I will answer some questions I have been asked over the last 21 days. Please remember that I am not an expert, I am merely reflecting on what I have done and read over the last 21 days.
Was it hard to switch? I could never give up X.
I won't lie, it wasn't as easy as the book might have you believe. For example, I came home to the boyfriend cooking bacon cheese burgers and almost caved in to the smells that filled the house. Instead I explained that while I didn't mind him eating his own food, I just needed to hang out in the other room so I wasn't tempted. Two weeks later, the same smell wasn't tempting anymore though because I am feeling so good that I don't want to break the diet. I also went through a nasty weekend where I dreamed about cheese. Don't ask. In short, I definitely felt a physical and mental pull to these foods that I had to consciously work to break. However, once they were broken, I am not feeling the same draw.
What do you eat? How do you get in protein and vitamins?
I eat lots of things! In October I have taken the Unprocessed pledge, so the last couple days have been a little different and I will be posting soon about eating unprocessed, but over the last 21 days I have enjoyed pizza (Domino's thin crust without cheese and loaded with veggies makes a great substitute when hanging out with friends!), I have also rediscovered a lot foods like bbq tempeh and seitan. I made veggie-friendly pockets which I froze for quick to-go meals and have been snacking on kale chips like it's my job. I use lots of nutritional yeast because it has B vitamins, but I also take a multivitamin (which I was doing before this challenge). My nutritionist warned me to avoid overindulging in soy proteins because she was reading research that too much soy could be harmful but that just meant getting a little more creative. I still had my iced soy lattes at Starbucks, but the rest of my daily proteins would come from beans, nuts, and grains. I did notice that my protein intake has not been as high as it was before, but some of the studies I have been reading suggest that plant based proteins are easier for the body to digest so it all works itself out in the end. In either case, my nutritionist just told me to stay aware of my body and if I felt like I had low energy levels, I should reevaluate my diet. However, I actually felt the opposite (except when I didn't sleep much during debate tournaments!). I feel like I have more energy than I did in August!
Do you plan to continue this diet?
This is a hard question for me to answer. I really like how I feel, but I worry about being too restrictive on myself. I am a fan of moderation although I am not always able to moderate myself. I love cheese. I could eat cheese for every meal. Do I miss cheese? Yes. Do I think I can moderate my cheese intake? Nope. This challenge helped me realize that I was having control issues with some foods. Dr. Barnard suggests in the book that for some people, diets that limit these foods to small portions only set a person who has an addictive chemical reaction up for failure. That the small dose triggers a call for more of the food. I said "prove it" because I just couldn't imagine giving it up completely could be a better option. But for me personally, it might be what I need to take control of my health. I do care about ethical treatment of animals, but this isn't why I took on the challenge, nor does Dr. Barnard address these concerns in the book. I did it for my health. I haven't been able to exercise because of a back injury but in the last 21 days my home scale says I lost 13 pounds. I didn't count calories. I didn't limit my food (but I did pay attention to getting in proteins and not solely eating processed carbs). I just cut out animal products. And by doing that I cut out trigger foods like cheese. I also found I could control my nut butter portions where several years ago I didn't trust myself with a jar of nut butter. And I don't think the diet taught me that but I think the awareness about what I was putting in my body did. So I realize I haven't answered the question, but I think it's because I still don't know. This week I will test my body. I will listen to it if I choose to eat something with dairy, egg or meat in it. And then next week I plan on reevaluating my choices. I think I will live a primarily plant based diet, but I am still exploring and figuring out what works for me.
However, this book definitely sold me on the challenge and I would love to give a reader a chance to check it out as well. I will personally buy one reader a copy of Breaking the Food Seduction to read and evaluate for themselves. You are not committing to the 21-day challenge, just winning a copy of a book that changed the way I think about food. Just leave a comment on this post for a chance to win. You can get four extra entries as well for a total of five:
Required Entry: Leave a comment on this post
Extra Entry: Become a blogger follower & let me know(or tell me you are already a follower)
Extra Entry: Become a fan of Uncovering Food on Facebook and let me know
Extra Entry: Share this contest with friends (either post a link on your blog or cc debatespeak at gmail on your email)
Extra Entry: Tweet about the giveaway with a link to the contest and include @UncoveringFood so I can add it to the entries
I will randomly draw an entry (numbers assigned via excel) on Monday, October 11 at 10pm PST and will announce the winner here on October 12. Good luck!
Subscribe to:
Posts (Atom)