Showing posts with label Gluten-Free. Show all posts

Friday, November 11, 2011

Travel-Friendly Energy Bites

(Photo courtesy of Andrew Wilder at Eating Rules)

By the time Thanksgiving rolls around, I will have been on the road almost every weekend for two months. The life of a debate coach is a crazy one. Toss in the food blogging shenanigans at the International Food Bloggers Conference (IFBC), and I feel like I am gone more than I am home. 

However, with time changes and quick layovers and late nights, sometimes I find myself without a healthy option for a quick bite. So I have been playing with a base recipe for granola bars that a friend gave me on a handwritten notecard. I modified it a bit to play with different flavors and hopefully amped up the nutritional profile just a bit.

Play around with what you choose to mix in and what nut butter you want to play with. This recipe makes about 36 1" by 1" squares but you can size it up however you want. The nutritional information below are for the specific name brands I used. Feel free to request the names if you want them or calculate your own nutritional stats.

Energy Bites
Yields: 36 bites

1/2 cup almond butter
3/4 cup brown rice syrup
2 tbsp cane sugar
2 tsp vanilla extract
3/4 cup reduced-fat unsweetened coconut shreds
1/2 cup dried goji berries
1/4 cup ground flax seeds
1/4 cup hulled hemp seeds
1/4 cup white sesame seeds
1 1/2 cups gluten-free oats
1 scoop Garden of Life protein powder

Combine brown rice syrup, almond butter, vanilla extract, and cane sugar in a small saucepan. Bring to a slow boil over medium heat and then reduce the heat. You want to make sure the nut butter has melted and the sugar has dissolved.

Combine coconut shreds, goji berries, flax meal, hemp seeds, sesame seeds, oats, and protein powder. Pour in liquid mix and stir until combined. I tend to knead the mixture by hand towards the end to make sure everything is combined.

Grease a 9X9 baking pan or use wax paper (I do both). Put "dough" into the pan and press it flat. Let harden (I toss it in the fridge to speed up the process). Remove from pan, cut into squares, and wrap in wax paper.

Per serving: 90.6 calories, 3.7 grams of fat, 11.8 grams of carbs, 1.6 grams of fiber, 2.5 grams of protein
Full recipe: 3263 calories, 134 grams of fat, 425 grams of carbs, 57 grams of fiber, 89 grams of protein

Friday, October 28, 2011

Peanut Butter, Kidney Bean, and Yam Stew

Peanut Butter, Kidney Bean, and Yam Stew - Do you know how hard it is to photograph late at night?!?

I love a good stew and I love peanut butter, so this summer when I had an opportunity to try some peanut butter stew, I was in LOVE! The stew was made by one of the administrators at the residential debate camp I was teaching at and she made it in a slow cooker. I kept meaning to ask for the recipe and I am sure at one point she even told me where she got her inspiration... but as the summer wound down and school picked up, I forgot to ask. However, I never forgot that stew.

This weekend while in Alaska, I was reading Colleen Patrick-Goudreau's The 30-Day Vegan Challenge, I found a stew that sounds like it had a similar flavor profile as the stew I enjoyed this summer although slightly different. So I took the recipe from this book, along with what I remembered from the summer stew, and modified it for my slow cooker. The resulting stew was creamy, sweet, spicy, salty. A mouthful of flavor and texture that tasted even better the second day!

While you can probably sub in sweet potatoes (and in some parts of the country yams are more difficult to find), I am a fan of the drier and more starchy yam. According to the Library of Congress, here are the differences!

The stew in a different lighting attempt!
Peanut Butter, Kidney Bean, and Yam Stew
Makes 10 1-cup serving

2 medium yellow onions, peeled and chopped
2 red bell peppers, deseeded and chopped
3 yams, cubed (I keep the skin on and scrub them well before cutting them)
5 cups of water
2 cubes of vegan vegetable bouillon cubes (you can replace these and the water with 5 cups of vegetable broth)
1 can (15-ounce) of kidney beans, rinsed and drained
1 can (15-ounce) of diced tomatoes
1/2 cup of creamy peanut butter
1 tbsp minced garlic
1 tsp minced ginger
1 tsp cumin
1 tsp ground cinnamon
1 tbsp brown sugar
1/2 tsp chili powder
1/2 tsp sea salt

Mix all ingredients in slow cooker and cook on low for 8-11 hours (I say 11 because that's when I got home and enjoyed it!).

When I calculated the WW pointsplus points for the items that have points (yams, bouillon, kidney beans, peanut butter, brown sugar) I got 5 points per serving.

Thursday, March 10, 2011

Collard-Wrapped Sweet Potato and Black Bean Hash


It's just a big green leaf but it was new to me this year. The Collard Green in it's raw and fresh form is something I had never purchased nor made but it's been popping up in my CSA pick-up almost every week this season and after preparing it in all of the ways I had prepared canned or frozen greens, I decided it was time to try something new (to me). I have had tacos with lettuce shells so why not a wrap with a collard green "tortilla"?

For those of you not familiar with the giant green leaf, it is actually a nutritional powerhouse. According to the Whole Foods Web site, these greens can help lower cholesterol and may protect against cancer. They are low in calories but high in vitamins K & A (among other great things!). So using them in place of a high-processed, carb-loaded wrap means you can up your nutrients while reducing your waistline.

To prepare the "wraps" you will want to first remove the fibrous stem from the collard leaf. Cut far enough into the lean to remove the coarse part of the stem but not so far you destroy the tortilla appearance. You will then want to blanch it in boiling water for 3-5 minutes until the leaves become pliable. Immediately following the boiling bath, give them an ice water bath and set aside to fill with your fillings of choice.

I filled my collard wraps with a quick and easy hash. I heated up some avocado oil, added half of a diced white onion and a diced sweet potato. Cooked these with some garlic powder, chili powder, sea salt, and black pepper. Then added some canned black beans when the potatoes became tender. Easy, simple, and you can adjust the ingredients according to taste.

Wednesday, October 20, 2010

Spicy Baked Okra Fries


Okra is in season in my area, as evidenced by the baggie full of pods that appear weekly in my CSA box. I love okra prepped in lots of ways, but this is one of the simplest ways to enjoy them. Serve as a side dish or snack (or in my case, breakfast on the way to the airport last week!). Warning that the larger pods do not fare well in this preparation because they tend to be tougher and have fibrous strings.

Spicy Baked Okra Fries
A dozen okra pods, each about 2 inches in length
2 tsp organic canola oil
1/2 tsp sea salt
1/2 tsp chili powder
1/2 tsp crushed dried red pepper

Preheat toaster oven (I use it to save energy for this single serving snack) to 400 degrees. Toss okra in oil to coat. Sprinkle salt, chili powder, dried red pepper over okra. Bake for 8-12 minutes until it is as brown as you would like it. This takes a couple attempts. I like it lighter brown as opposed to darker in color. Unfortunately I made this last batch in the kitchen before the sun rose, so with the lighting it is hard to tell.

Makes one serving. 69 calories, 4.5 grams of fat, 3 grams of fiber, 2 grams of protein

Wednesday, October 13, 2010

Easy Pear Chips in the Dehydrator


I was one lucky blogger last Friday at BlogHer Food when the USA Pear Council was packing up their table and offered me a giant glass vase full of pears. There were many varietals of pears and my mind was a flurry with everything I could do with them. With travel plans in my near future, I knew the first thing I had to make was travel friendly fare: Pear Chips!

If you had the chance to meet me at BlogHer Food, you may have had a chance to sample kale chips or several other dehydrator experiments that are in the works. Confession: I am glad no one is around to sample these pear chips because they are just so darn good! The vitamin C tablets help prevent discoloration. The darker chips below are a varietal that has more natural pigment than the other chips.

Pear Chips made from several pear varietals. Regular chips on the left and cinnamon chips on the right.

Dried Pear Chips
Four Semi-Ripe Pears, peeled and sliced 1/4 inch on a mandolin
6 Vitamin C Tablets, crushed
Water
Ground Cinnamon (optional)

Mixed vitamin C tablets with water. Add sliced pears and soak for ten minutes. Remove slices and pat dry. Lay on dehydrator trays in a single layer, do not overlap! You can sprinkle the slices lightly with cinnamon.

Dry at 135 degrees for five to seven hours until you reach desired crispness. Store in airtight container away from light. If you even get around to storing them :o)

Makes two servings: 141 calories, 7.5 grams of fiber

Sunday, October 3, 2010

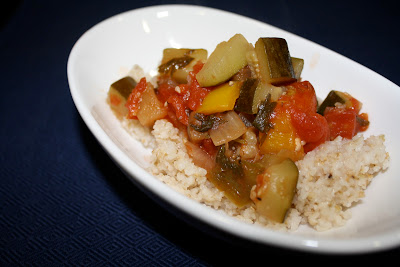
Simple Ratatouille Recipe aka "Rat-tat-tat-too-eeee!"


This vegan dish with a complicated sounding name (unless you have seen the Disney movie) is a hearty entrée perfect to make on a Sunday and enjoy all week. You can change up the proportions of vegetables to your liking and adjust spices as well. While I used fresh herbs, if they aren't in season you can easily use dried herbs in their place, although the amounts may need to be adjusted. I developed this recipe as part of the round three Project Food Blog challenge of pairing wines at a six-course vegan dinner party.

To modify this for the HMR Healthy Solutions Diet, omit oil, use 6 ounces of vegetable broth and two tablespoons of vinegar in place of wine.

1 1-lb eggplant, skinned and diced
2 tsp salt
1 28-oz can diced tomatoes
5 cloves garlic, peeled and diced
1 tsp black pepper
1/3 cup chopped fresh basil
1/2 cup chopped flat-leaf parsley
2 tbsp olive oil
3/4 lb yellow onion, diced
 2 bell peppers, any color, diced (I used four small peppers but they are hard to find sometimes)
1 1/4 lb zucchini, diced
6 oz dry white wine of your choice

Spread eggplant in a single layer on paper towels and sprinkle with salt. After twenty minutes, press eggplant with fresh towels to remove liquid that the salt has brought out. Do not rinse.

In a deep pot, cook tomatoes, garlic, ground pepper, basil, and parsley on medium heat.

In a skillet, cook onion and bell peppers in olive oil for ten minutes on medium-high heat. When the vegetables have started to brown, add mixture to pot with tomatoes. Add eggplant and zucchini to tomato mixture as well and stir to combine all ingredients.

Cover the pot and cook on medium-low for 45 minutes. Add wine and cook for an additional 15 minutes.

I served the ratatouille with a brown rice couscous I found at Whole Foods. This filling dish made a tasting portion for 10 with tons of leftovers and could easily make 8 entrée portions. Nutritional information does not include couscous. One serving has 120 calories, 3.5 grams of fat, 5.75 grams of fiber, 3 grams of protein.

Sunday, September 26, 2010

Uncovering Uthappam: Celebrating Cultural Classics

Uthappams with Onion, Tomato, and Coriander

When I was younger, I was a very picky eater. My parents were not okay with this. They wanted to expose me to a variety of foods and to try everything. I remember a couple of nights where my dad would tell me that I could just go hungry if I didn't want to eat what was for dinner. I probably threw a temper tantrum but would inevitably eat dinner because I was hungry.

My parents were right. I might not have liked everything I was fed but it expanded my palate and taught me to try everything at least once. When I found out on Friday that Uncovering Food had made it to round two of Project Food Blog (Thank you to those who voted!), I was excited to find out what the challenge was:

"Ready to tackle a classic dish from another culture? Pick an ethnic classic that is outside your comfort zone or are not as familiar with. You should include how you arrived at this decision in your post. Do your research then try to pull off successfully creating this challenge. Try to keep the dish as authentic as the real deal, and document your experience through a compelling post."

I am always ready to learn about new cuisines! This was right up my alley! At first I thought I would learn how to make a traditional Hungarian dish since my dad's family is from Hungary and I have never learned how to make any of the dishes he made me. This would be out of my comfort zone but there were three other challenges I faced when selecting my dish. One, I am familiar with Hungarian food. In my mind this challenge was asking me to find a classic dish from a culture that I don't know very well. The second constraint was that I am partaking in the Physicians Committee for Responsible Medicine 21-day vegan challenge which means the dish I would be making would need to be vegan. The third constraint was that I would be at a debate tournament all day Friday, Saturday, and Sunday so I would have limited prep and shopping time late in the evenings and early in the mornings.

A number of students I work with are from southern states in India and I knew a couple of them were vegan, so I asked for a restaurant recommendation for lunch on Friday to explore the cuisines of this part of India. My assistant debate coach and I ended up at Madura, a vegetarian restaurant with a number of vegan options. We ordered a variety of items on the menu to try and when I broke out my camera, that's when the education started.


Madura Dishes (clockwise from left): Medhu Vada & Rava Kichadi; Pea, Onion, and Mushroom Uthappam; Spring Dosa
The owner of the restaurant asked what I was taking pictures for and I explained the Project Food Blog challenge. He was especially nice to us upon learning this and explained to me how each dish was prepared and what ingredients were in every dish. I will definitely be going back to Madura to enjoy more of the dishes that were lighter than Indian dishes I was more familiar with from other regions of the country. Every dish I tried was full of flavor and would have been fun to make, but keeping in mind that Uncovering Food is about exploring healthier options, I opted to make Uthappam, a pancake that is eaten for breakfasts and lunches and is embedded with a variety of vegetables and spices.

What I failed to learn at the restaurant was how much time goes into preparing the batter. The first step takes 6 to 12 hours, then after a few prep steps you have another 12-48 hours of fermentation before the cooking of the batter. Which meant I would need to buy ingredients on Friday night after the tournament and cook the Uthappam on Sunday morning before leaving for the 8 a.m. tournament.

I also hadn't anticipated that one of the primary ingredients would be difficult to find at a traditional American grocery store. When I was told the dish contained lentils, I wrongly assumed they were the ones I was familiar with. However, Uthappam utilizes Urad Dal which is much smaller than lentils most Americans are familiar with.

This is a real penny. Split Urad Dal is very small! 
Be careful to not confuse it with larger lentil varieties.
Luckily, after a harrowing search by fellow coaches and students I found a kit for another Indian dish at Whole Foods that had a bag of plain urad dal in it, so I was saved with only seven minutes before the store closed. I took my ingredients back to the tournament, which hadn't ended, and anxiously waited for the rounds to finish.

The recipe I ended up making came about from both my conversations at Madura but also with parents at the debate tournament. I learned that many people now buy the flour pre-made for Uthappam but the best are always made from scratch. It reminded me of the difference between Bisquick and homemade hot cakes. However, I never got exact measurements and after doing some online research, I realized there is no exact formula. The ratios of rice to urad dal are between 2:1 and 3:1 and sometimes have the addition of cooked rice and/or flattened rice in the batter. While I would have probably soaked my rice and urad dal a bit longer because it supposedly heightens the flavor of the Uthappam, this recipe got rave reviews from the students and coaches who tried it on National Pancake Day (how appropriate to prepare these Indian pancakes on a day that celebrates it's American cousin!).

Uthappam is a thick hearty pancake that can be topped with a variety of vegetables, fresh herbs, and spices.

Tomato-Onion-Coriander Uthappam

2 cups long-grain white rice, uncooked
1 cup split urad dal, uncooked
1 tsp sea salt
1 vine-ripened tomato, sliced thin
1 small purple onion, sliced thin
fresh coriander, minced
canola oil, as needed

Rinse rice and urad dal in separate containers and soak for eight to twelve hours.

Drain and grind rice while reserving the liquid. Drain and grind urad dal while reserving the liquid. Mix rice powder, urad dal powder, and salt together. Add small amounts of each liquid until you reach a thick but spreadable consistency. This will vary depending on how long you soaked the rice and urad dal, but I added about a half cup of liquid. You will want the batter to look almost like a thick pancake batter that can be poured but is thick enough for the toppings to stick to. Cover the batter and let sit in a warm place to ferment for 12 to 48 hours.

Warm a large frying pan or griddle to a medium-high heat. I found in my research that the Uthappam is often cooked on a Tawa or Tava which can reduce the amount of oil needed because of the concave shape of the pan/griddle.

Pour the desired amount of batter on the griddle and spread to a thickness of about a quarter to half inch. Sprinkle tomato, onion, and coriander on the uncooked side. You can choose to drizzle oil over the top of the Uthappam or around the edges. Once the bottom is browned, flip over and let the toppings-side cook for about ten seconds. You want the batter to brown lightly to secure the toppings without burning the toppings.

Remove from pan and serve with a tomato chutney or Sambar, a lentil soup that usually contains tamarind, toor dal (yellow lentils), and a blend of spices commonly known as sambar curry powder.

Recipe makes 8 Uthappam approximately six-inches in diameter. Nutritional information does not include the optional oil.

One tomato-onion-coriander Uthappam has 258 calories, .69 grams of fat, 9.14 grams of fiber, 8.68 grams of protein.

Friday, September 24, 2010

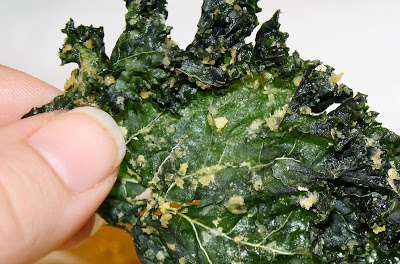
Super Easy Crispy Kale Chips (that aren't baked!)


While reading an article in the latest copy of Vegetarian Times about using your dehydrator to make healthy snacks, a friend told me that Ellen recently gave Lady Gage a kale bikini. I turned the page and there was a recipe for kale chips. I was inspired. And it didn't hurt that I found a Nesco dehydrator on sale the next day. It was like someone was telling me I had to make kale chips. So I did.

These chips are crunchy, sweet, and salty with a hint of citrus. It was quick and easy to prep and ready in one night. I portioned the chips out and will be taking them to this weekend's debate tournament to munch on instead of the less healthy snacks that will be available. Can't wait!

In addition to the incredible flavors, these kale chips are also good for you. Kale is rich in vitamins A, C, and K as well as a good sources of calcium. There are also a number of studies that suggest diets that include cruciferous vegetables like kale may reduce your cancer risks.

This recipe also includes nutritional yeast which is a dry, yellow, inactive yeast that has a cheesey flavor. It is a good source of B12, protein, and fiber. You can usually find it in the bulk section of health food stores. If you haven't tried it before, don't be afraid of it like I was the first time I bought it. It has a distinct smell but one I have grown to love. In addition to using it in this recipe, I also recommend sprinkling it on air-popped popcorn after drizzling the popcorn with unfiltered olive oil. Yum.

Using the dehydrator has several advantages over attempting to make kale chips in your oven. First, is that the chips maintain their bright green color instead of browning and don't get brittle. Second, you have the option to prepare the chips at a lower temperature if you prefer to eat a raw foods diet. Finally, according to "How to Dry Foods" written by Deanna Delong, energy costs are much higher using a traditional oven.


Kale Chips

1 bundle of curly kale leaves, approximately a lb
5 tsp organic canola oil
1 tbsp fresh lemon juice
1.5 tsp sea salt
4 tbsp nutritional yeast

Tear kale leaves into pieces about the size of your palm or slightly smaller. Tear around the more bitter center stalk to avoid including this tough and chewy part of the leaf. Wash and spin dry the kale pieces.

Toss kale with oil, juice and salt. Make sure to coat the leaves. Add the nutritional yeast and toss to coat the leaves.

Lay leaves out on the dehydrator in single layer and set temperature to 125 degrees. It will take two to four hours to dry to a crisp chip. Check at the second hour and then again periodically, removing the smaller leaves which will become crunchy before the larger, more dense leaves. You can choose to set the temperature lower if you are only eat raw foods, but it will take longer to come to a crisp.

Store in an airtight container in a dark cool place.

Makes approximately 5 servings - 89 calories, 5 grams of fat, 3 grams of fiber, 5 grams of protein

(modified from "DIY Fruit & Veggie Chips," Vegetarian Times, October 2010)

Kale

Thursday, September 16, 2010

Uncovering Pistachios: Heart-Health and Happy Eats


Memories of my childhood include my father sitting on the patio, cracking open pistachios while telling political and historical stories that were more intriguing than anything I could read in a history book or watch on the news. I remember getting to crack open my own pistachios, the salty hard outer shell with the green and white seeds inside taunting me with their rich nutty goodness.

Recently I began seeing a nutritionist (Hi Lauren!) to ensuring my version of "healthy eating" was on par with what I really should be eating in order to not only lose weight but improve my overall well-being. One of the things I realized while keeping my food journal is how I eat a relatively low-fat diet. But the fats I was consuming were often not the healthy ones (yum bacon!) so when I hit the road this past weekend for a debate tournament in North Carolina, I needed to find a way to increase healthy fats without just doing shots of olive oil in my hotel room (that could be an interesting drinking game on a random Friday night though...).

I looked through the list of healthier options and that is when I saw a flash from the past. Pistachios! Not only are they delicious, they are also relatively good for you (in moderation of course). So I made it a point to buy a bag, portion them out, and carry them in my camera bag/purse for the tournament. Eating a half cup of pistachios kept me entertained for a reasonable amount of time and when I finished them, I was full! Which is when I realized that while many of us enjoy these little green morsels, how many of us know all of their health benefits?

Apparently there is a Web site (or course there is) dedicated to the health benefits of pistachios. Actually there were hundreds. But rather than just trust sites that are probably funded in part by the industry (not that they are wrong, but more for the academic "evaluate sources" teacher in me), I decided to hit the academic research on the nut.

Researchers at Penn State in an article in the Journal of Nutrition in June 2010 conducted research that "suggests that a heart-healthy diet including pistachios contributes to the decrease in the serum oxidized-LDL concentration through cholesterol-lowering and may provide an added benefit as a result of the antioxidants the pistachios contain."

According to the USDA Nutrition Laboratory, one ounce of dry-roasted salted pistachios (in shell) has 161 calories, 2.9 grams of fiber, 13 grams of fat, 6 grams of protein, and a number of minerals and vitamins including 137mg phosphorus (RDA 700mg).

Ultimately, I like pistachios because of their creamy nutty flavor, plus they are fun to eat! But it is also good to know that I am doing something good for my body in the process. I eat them by themselves but would love to know how you enjoy your pistachios!

Tuesday, November 17, 2009

Oikos Miniature Pumpkin Chocolate Cheesecake


When my students performed well at a local debate tournament, I wanted to celebrate their success. However, I wanted to keep that celebration healthy and include my students with gluten and nut allergies.

As a health conscious individual who has a fetish for Greek yogurt, I was excited to hear about Stonyfield's Oikos Organic Greek Yogurt recipe contest. Combining Greek yogurt with some seasonal flavors, I came up with a celebratory treat that had my whole debate team cheering. These mini cheesecakes weren't just tasty and allergy-conscious, but the high protein and lack of fat in the Oikos yogurt made it a low-calorie treat for me as well!

Oikos Miniature Pumpkin Cheesecakes with Chocolate Drizzle

Crust:
3/4 cup brown rice flour
2 tbsp flax meal
1/6 cup tapioca starch
2 tbsp vegetable oil
1/2 tbsp pure maple syrup
pinch of salt
1/4 cup of water

Filling:
5.3 oz container Oikos Fat Free Organic Plain Greek Yogurt
3/4 cup reduced fat cottage cheese
1/4 cup fat free cream cheese
1/2 cup egg whites
3/4 cup canned pumpkin
1/2 cup sugar
1 tsp pure vanilla extract
1 tsp pumpkin pie spice

Topping (Instead of including the chocolate in the cheesecake, I turned it into a drizzle so that I could leave it off a couple of servings for students who couldn't have chocolate.):
Chocolate (I use a gluten free, nut free, semi sweet chocolate)

Preheat over to 300 degrees. Coat a mini muffin tin with your choice of oil/spray (count additional calories accordingly). Mix crust ingredients together. Press crust into the bottom of each tin. Blend the cottage cheese, yogurt and cream cheese together until smooth. Add the remaining filling ingredients. Spoon the filling into the tins. Do not overfill. Remember it will bake up slightly.

Bake for 25 minutes or until the cheesecakes are firm to a gentle touch. Turn off the oven and let the cakes sit in the oven for an additional ten minutes. Remove and refrigerate in the tin overnight before loosening and removing.

The final optional touch is drizzling melted chocolate or dipping the cheesecakes into the chocolate to form a candy crust. I melt a measure amount of chocolate in the microwave (heat for 10 seconds, remove and stir and repeat until desired consistency).


My students LOVED the cheesecake bites and didn't realize how healthy they were until I told them after! The cheesecakes disappeared so quickly the other teachers in my department never got to try them. So it looks like I will be hitting the store for more Oikos yogurt to whip up another batch.

Each miniature cheesecake sans chocolate: 62 calories, 1.7 grams fat, .6 grams fiber, 2.8 grams protein

Do you want a chance to try your hand at crafting an amazing recipe that feature Oikos Greek yogurt? Are you a fan of Greek yogurt and just want to share your love with other fans? How about scoring some free coupons for this fabulous yogurt (that has amazing calorie stats... only 80 calories in a single serving cup!)? Become a fan of Stonyfield Farm Organic Oikos Greek Yorgut on Facebook today!

I am also excited to announce that Oikos is sponsoring a fabulous relaxation giveaway that starts tomorrow on Uncovering Food. I hope that tomorrow you will grab a cup of yogurt goodness, open your laptop, and visit us tomorrow to check out this spa themed giveaway :o)

Disclaimer:

I get asked by readers if I am being paid to push products. The simple answer is no. In fact, most of the products I write about are ones I have found and purchased during my trips to the grocery store or on the road. Occasionally, a company will send a sample my way and if I believe the product will serve a need for my readers and I would buy the product myself, then I will share it with you. Sometimes I will write to a company after reading about it, if I believe it will help us lead healthier lifestyles. But even then, if the product doesn't pass my scrutiny, it won't make the screen of Uncovering Food. You can trust that every product or recipe posted here has passed through my lips, and that I wouldn't blog about it if it wasn't worthy of you... my favorite readers.